Use Copilot to generate an AI code


‘Any sufficiently advanced technology is indistinguishable from magic.’ Arthur C. Clarke
In the SBC Neural Network post we saw a 1k weights network trained with 10k samples to approximate the sine function. In this post we will use a 175G weights trained with 450G samples that can program better than the average programmer. The size of these models are impressive, but actually nobody knows really how they work or what are their limitations.
GitHub Copilot is an AI tool that speeds up software development, allowing the programmer to do many things that were previously impossible. At first, it seems similar to use StackOverflow, a website where programmers send questions when they don’t know how to do something, but Copilot goes much further, it is able to synthesize a new answer for our problem.
Copilot is included in a Microsoft Visual Studio Code and continuously suggests codes in grey that you can accept by pressing the tab button. This suggested code can be roughly defined the “most common” match between your query (your code) and the training dataset (GitHub code).
Example 1

In this example, we define our function and its docstring and ask Copilot for completion. As we see, the completion corresponds with the docstring. The first intuition is that Copilot acts as a search engine and simply matches your query with its training dataset (150GB of open source projects), but this is not how it works.
Example 2

Here we create some random/crazy string that can’t be in the training set. The result still looks like is the most coherent solution that can be provided, in this case: the sum of the input parameters.
Example 3

In this example, we ask (in Spanish) to sum the area of intersection of two circles given its center and radius. Copilot understands the Spanish text without problems and suggests the function name, the parameters and all the function body. After a short review it looks like the code should work.
Example 4

Now we create a hypothetical question/answer text. This makes Copilot match the query to some exams that can be in this training dataset. We simply ask for the capital of Spain, and Copilot generates the correct answer.
Example 5

However, if we ask about a non existent country, Copilot also gives its best answer that looks “correct” too.
Example 6

In this example we reverse the process, we give the answer to try to generate the question. Copilot generates a question that we did not expect. We expected ‘What is the capital of France?’ and Copilot asked ‘What is the result of the following code?’ but still we can understand a correct suggestion.
Example 7

Here we force Copilot to ask about what we want changing to a more common language and adding first letter. However, it generates another question, this time completely wrong and has no relation with the answer.
In summary, Copilot:
- Builds a suggestion based on the most common solution.
- Is usually correct simply if your query makes sense.
- Is usually wrong when your query looks like a common problem but it is not, and it actually has a very different objective.
Copilot using open source libraries
Copilot was trained with open source projects. It includes millions of use cases of any open source library like numpy, opencv, qt… This makes Copilot really useful because it helps the programmer with the most common suggestion that is usually the best.
Example 8

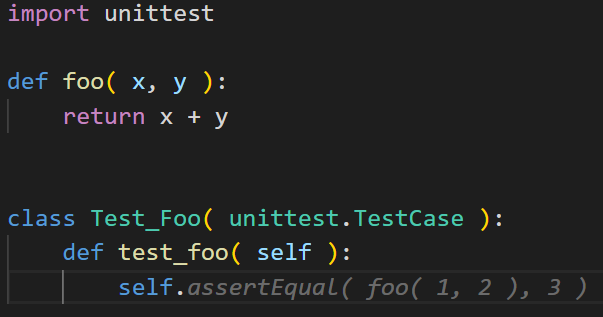
In this example, we use the unittest python module, and Copilot knows that the unittest.TestCase has a method named assertEqual and also knows that foo( 1, 2 ) should be 3.
Example 9

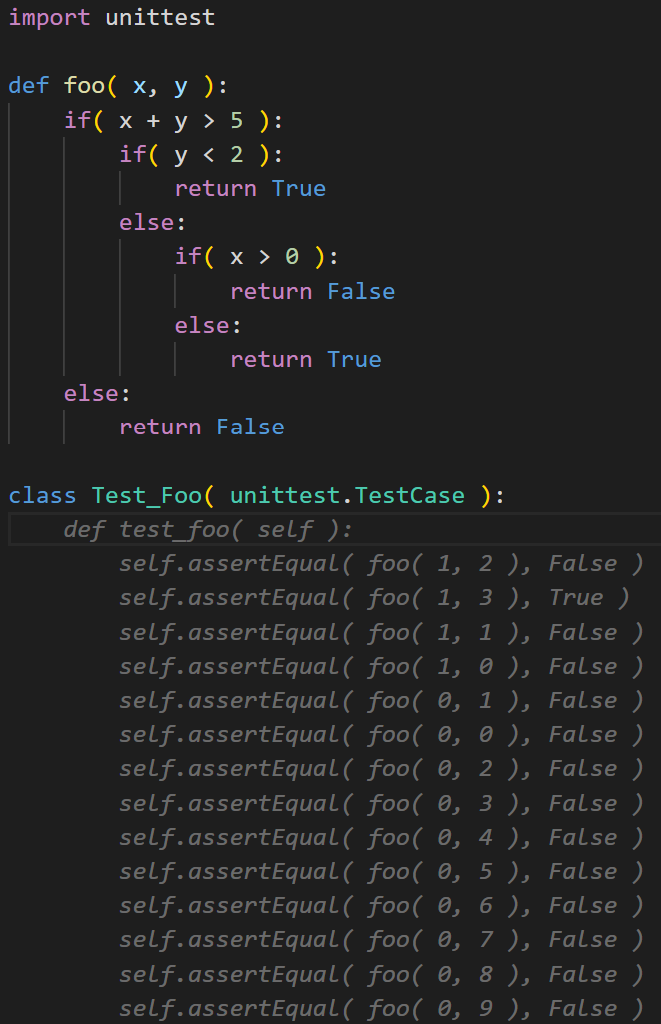
Above we create a more complex foo function (that we assume it can’t be in the training data), to see if Copilot really understands the code. After running the code with 17 test cases, only 6 failed giving a 65% of success ratio.
It may not seem like much, but keep in mind that Copilot is not a python interpreter, it has not executed the function to get its output… Copilot has used what learned during training to convert our query in the output that has perfect python syntax and also works well 65% of the time.
Example 10

One might expect that a long input text will cause Copilot to fail, but it doesn’t, the more information we give, the better answers copilot can generate.
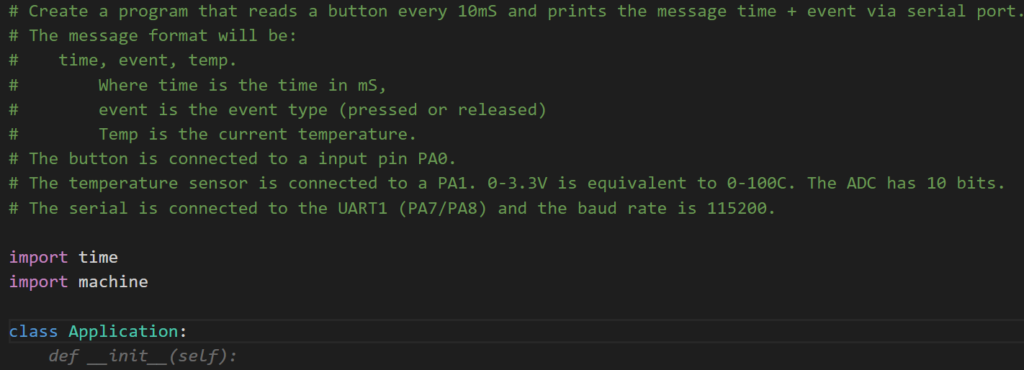
In the example above we ask for a complex task, a complete program that requires different understandings to solve, like: python programming skills, micropython specific libraries and how to use them correctly even in human text description understanding.
The full hint is displayed in the next cell. Note that it matches the program description very well. The application class makes sense, and even the micropython libraries (PIN, UART, ADC, PIN.irq…) are correctly used. It is not 100% perfect, for example in this case temp_senor is an ADC object, which doesn’t have temp_sensor.init() method, and other small errors can be generated, but the whole structure of the program is definitely correct and the small errors can be fixed easily.
1 2 3 4 5 6 7 8 9 10 11 12 13 14 15 16 17 18 19 20 21 22 23 24 25 26 27 28 29 30 31 32 33 34 | import time import machine class Application: def __init__(self): self.button = machine.Pin(0, machine.Pin.IN) self.temp_sensor = machine.ADC(machine.Pin(1)) self.uart = machine.UART(1, 115200) self.uart.init(115200, bits=8, parity=None, stop=1) self.last_event = 0 self.last_temp = 0 self.last_time = 0 self.button.irq(trigger=machine.Pin.IRQ_FALLING, handler=self.button_pressed) self.button.irq(trigger=machine.Pin.IRQ_RISING, handler=self.button_released) self.temp_sensor.init() def button_pressed(self, pin): self.last_event = 1 self.last_time = time.ticks_ms() self.uart.write(b'{},{},{}\n'.format(self.last_time, self.last_event, self.last_temp)) def button_released(self, pin): self.last_event = 0 self.last_time = time.ticks_ms() self.uart.write(b'{},{},{}\n'.format(self.last_time, self.last_event, self.last_temp)) def read_temp(self): self.last_temp = self.temp_sensor.read() self.uart.write(b'{},{},{}\n'.format(self.last_time, self.last_event, self.last_temp)) def run(self): while True: self.read_temp() time.sleep(0.1) |
Example 11
Finally, in the example below we use Copilot to add the comments to the previous code. We copy the class twice and add some guide to Copilot like “Docstring version of the above class”. Copilot generates the class and comments for each line.
1 2 3 4 5 6 7 8 9 10 11 12 13 14 15 16 17 18 19 20 21 22 23 24 25 26 27 28 29 30 31 32 33 34 35 36 37 38 39 40 41 42 43 44 45 46 47 48 49 50 51 52 53 54 55 56 57 58 59 60 | # Docstring version of the above class class Application: """ Brief: This is a simple application that reads the temperature sensor and sends the data to the UART. The data is sent in the format: time,event,temp The time is the time in milliseconds since the start of the application. The event is 1 if the button is pressed and 0 if the button is released. The temp is the temperature in degrees celsius. """ def __init__(self): # Create a button object self.button = machine.Pin(0, machine.Pin.IN) # Create a temperature sensor object self.temp_sensor = machine.ADC(machine.Pin(1)) # Create a UART object self.uart = machine.UART(1, 115200) # Initialize the UART object self.uart.init(115200, bits=8, parity=None, stop=1) # Create a variable to store the last event self.last_event = 0 # Create a variable to store the last temperature self.last_temp = 0 # Create a variable to store the last time self.last_time = 0 # Register the button pressed event handler self.button.irq(trigger=machine.Pin.IRQ_FALLING, handler=self.button_pressed) # Register the button released event handler self.button.irq(trigger=machine.Pin.IRQ_RISING, handler=self.button_released) # Initialize the temperature sensor self.temp_sensor.init() def button_pressed(self, pin): # Set the last event to 1 self.last_event = 1 # Set the last time to the current time self.last_time = time.ticks_ms() # Send the last time, last event, and last temperature to the UART self.uart.write(b'{},{},{}\n'.format(self.last_time, self.last_event, self.last_temp)) def button_released(self, pin): # Set the last event to 0 self.last_event = 0 # Set the last time to the current time self.last_time = time.ticks_ms() # Send the last time, last event, and last temperature to the UART self.uart.write(b'{},{},{}\n'.format(self.last_time, self.last_event, self.last_temp)) def read_temp(self): # Set the last temperature to the current temperature self.last_temp = self.temp_sensor.read() # Send the last time, last event, and last temperature to the UART self.uart.write(b'{},{},{}\n'.format(self.last_time, self.last_event, self.last_temp)) def run(self): while True: # Read the temperature self.read_temp() # Wait 0.1 seconds time.sleep(0.1) |
 and
and 


