Update (16/09/2024): We have plenty of stock of all our products, find us also in and    Shop now

How to configure simpleRTK2B – Basic Starter Kit (ZED-F9P module) and connect it to Ardupilot to get centimeter accurate GPS location

how-to-configure-simpleRTK2B-and-connect-to-ArduPilot-cover

We have created this tutorial for basic setup when you need to connect your RTK receiver powered by the ZED-F9P module to ArduPilot

We will walk you through the steps required to configure your receiver, ensure proper communication between the devices, and connect RTK corrections to provide centimeter-level accuracy for your Ardupilot project.

Required hardware:

Required software:

How to connect simpleRTK2B with ArduPilot?

Firstly, configure simpleRTK2B receiver.

  1. Connect receiver to your PC via the USB port labeled as POWER+GPS with a micro-USB cable.
  1. Run u-center and connect your receiver to u-center via com port.
  1. Ensure your RTK receiver has Firmware 1.13. If you need guidance on checking your receiver’s firmware version or updating it to version 1.13, please visit our configuration file page for detailed instructions.
    The maximum frequency of Firmware 1.32 for your ZED-F9P receiver is 7Hz. Therefore, we recommend using Firmware 1.13 for a 10Hz update rate in this tutorial.
  2. Go to Tools–>Receiver Configuration…–>Select configuration file simpleRTK2B_FW113_HeadingKit_Rover_10Hz_Ardupilot.txt (right click and select save link as) which we have prepared for you
    This configurations file will set your receiver to an output rate of 10Hz and to transmit UBX-PVT messages to the autopilot..
  3. Click Transfer file–>GNSS to transfer the configuration to your receiver.
  1. In the menu bar, go to Receiver–>Action–>Save Config to save your configuration.

Secondly, configure ArduPilot.

  1. Connect your Pixhawk to your computer using a USB to micro-USB cable.
  2. Make sure your already finish the initial setup of your autopilot. You can check the user guide of ArduPilot to see how to do it.
  3. Open Mission Planner and connect your Pixhawk to it with COM port.
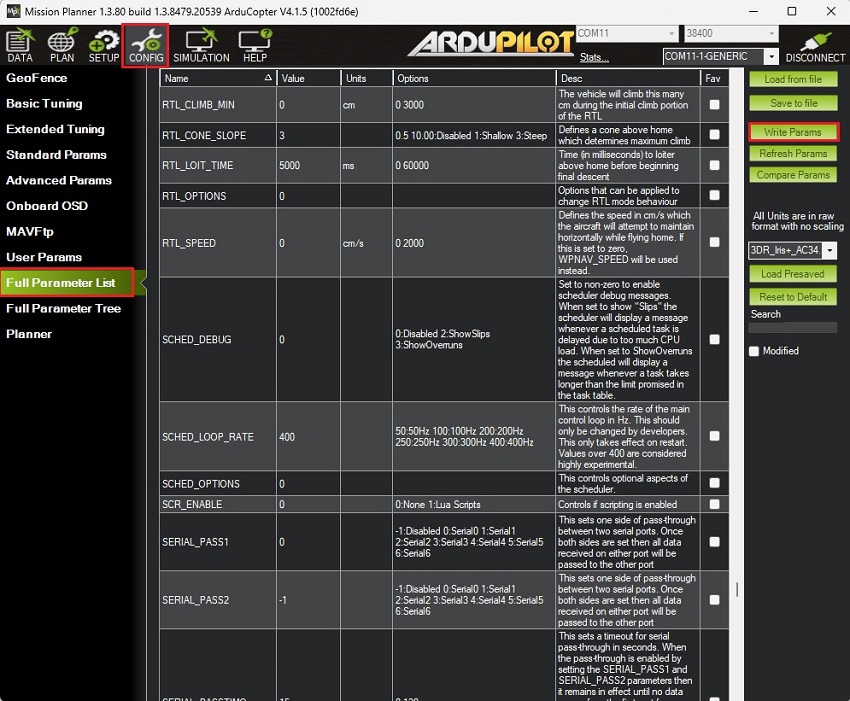
  1. Go to CONFIG–>Full Parameter List.
    Given that the firmware versions might differ from yours, there is a list of all parameters that have been modified compared to the default configuration below:

    COMPASS_ENABLE,0
    COMPASS_USE,0
    COMPASS_USE2,0
    COMPASS_USE3,0
    EK3_MAG_CAL,5
    EK3_SRC1_YAW,2
    GPS_AUTO_CONFIG,0
    GPS_AUTO_SWITCH,0
    GPS_POS1_X,-1.25 *This value must contain the distance in meters between antennas. Change sign if heading has a 180deg offset (or swap SMA connectors in simpleRTK2B+heading).
    GPS_PRIMARY,1
    GPS_RATE_MS, 100
    GPS_RATE_MS2, 100
    GPS_TYPE,0
    GPS_TYPE2,2
    SERIAL1_BAUD,460
    SERIAL1_OPTIONS,0
    SERIAL1_PROTOCOL,5

    Press Write Params to save your setting.

  1. After saving all the parameters, make sure you remove the power from your autopilot by disconnecting USB cable to reset your autopilot.

Thirdly, connect the receiver to your autopilot.

  1. Connect the antenna to your receiver. Make sure your antenna has a good view of the sky for testing.
  2. Make sure you have the correct JST cable for Pixhawk 4.
  1. Use the JST connector on the simpleRTK2B receiver and connect it to the TELEM1 port.
  1. Power the autopilot, you will see GPS2 is connected.
  1. In Mission Planner, you can check the GPS information by going to CTRL+F–>MAVlink inspector–>GPS2_RAW.
    The altitude, latitude and longitude information on Mission Planner should be the same as on u-center.

Finally, connect to RTK corrections.

  1. Without RTK corrections, simpleRTK2B receiver will have an accuracy of up to 1.5 meters. If you want to achieve centimeter-level accuracy of location, you will need RTK corrections for your receiver. RTK corrections can be received from a local NTRIP correction service or from your own RTK base station.
    • Using NTRIP Services: If you have an internet connection in the area where you are going to operate, the simplest way to receive RTK corrections is through an NTRIP correction service because you don’t need any additional equipment. Check tutorial How to send NTRIP corrections to ArduPilot. Follow step 4-8.
    • Setting up your own RTK Base Station: If you are in a location without reliable internet access, you can set up your own RTK base station. This will require an additional simpleRTK2B – Basic Starter Kit for it. The base station will transmit RTK corrections to ArduPilot, allowing you to achieve centimeter-level accuracy even in remote areas. Check tutorial How to send RTK base station corrections to ArduPilot. Follow step 1-6.
  2. In a few seconds, on Mission Planner you will GPS2 status change to rtk Float or rtk Fixed

Now you can enjoy your ArduPilot project with your high precise RTK receiver!

If you want to do this tutorial, we have all the products in stock and ready to be shipped:

If you liked this content, you can follow us on Twitter, YouTube, Facebook or LinkedIn to stay updated of content like this.

Got any questions or requests?
Contact us! We'll answer <24 hours!

Icon
Contact ArduSimple
Close

Want to learn more about GPS/RTK?

1. Our engineering team will contact you to solve any questions
2. We will keep you updated about promotions and new product releases
3.You will only hear from us when we have important news, we won’t spam your email