 and
and 

How to configure u-blox ZED-F9P
Introduction
This page applies to the simpleRTK2B series receivers powered by the ZED-F9P modules. We will guide you through the steps for the basic usage of the u-center software, which is designed for evaluating performance, conducting performance analysis, and configuring u-blox receivers.
Install u-center
You can download u-center here (Download version for F9, not u-center2).
U-center is compatible with Windows. If you want to use on Linux and Mac computer check our tutorial How to install u-center on Ubuntu and How to install u-center on macOS.
After a successful installation, u-center can be started from the Start Menu and will start up as shown in following image.

Connect to u-center
- Connect the GNSS antenna to your receiver. Make sure the antenna has a good view of the sky for testing functionality. Otherwise, you won’t see satellites view and signal.
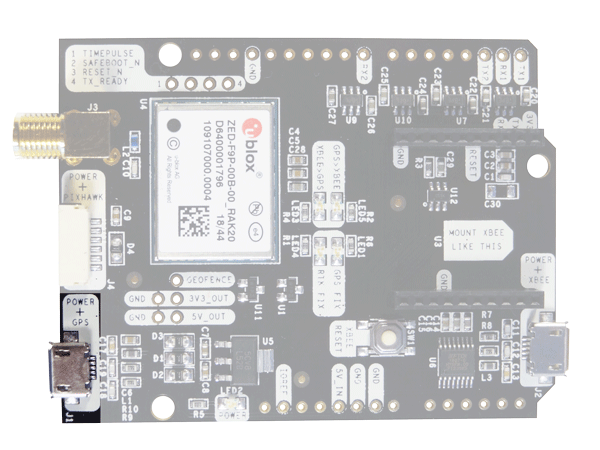
- Connect the receiver to your PC via the USB port labelled as POWER+GPS.
- Open u-center. Select the COM port to connect your receiver. If you don’t know which COM port your receiver is connected, check the Device manager of your PC.
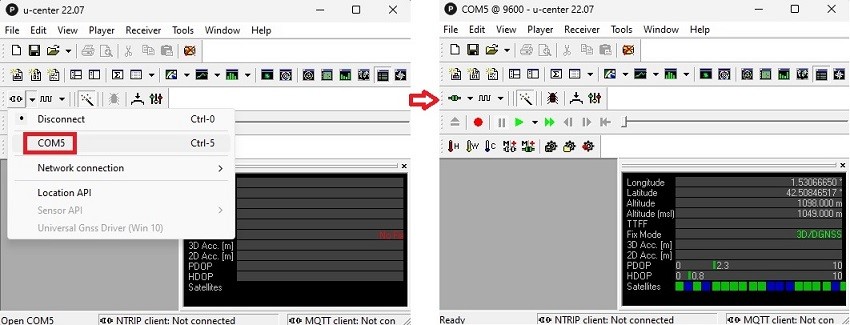
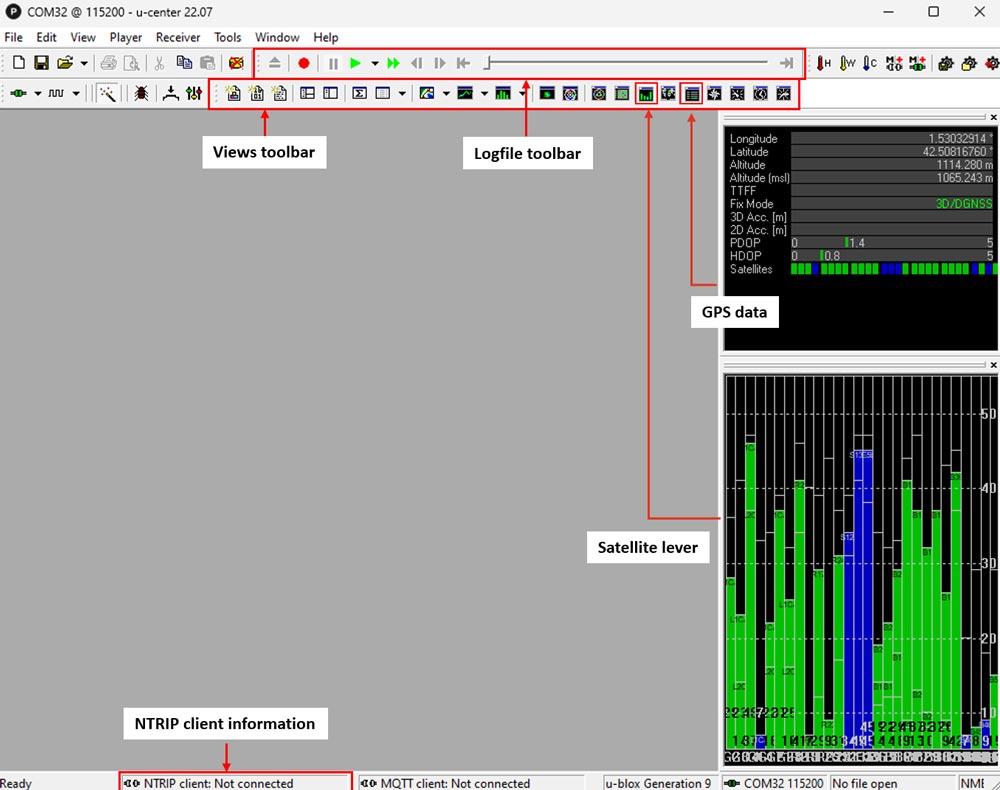
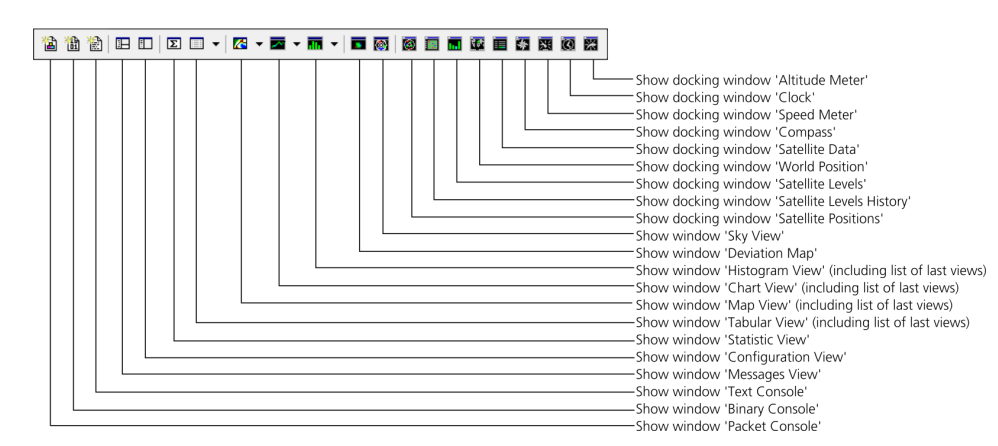
- In the views toolbar, you can choose the data you want to visualize. We recommend enabling GPS data and satellite levels by clicking the icons highlighted in the red squares to view the coordinates and signal strength. You can arrange the location or toolbar by clicking and dragging with the mouse. Additionally, you can change the position and size of the docking window using the mouse.
Firmware version check
- There are two versions of the ZED-F9P firmware available for download:
- Version 1.13 (supports up to 10Hz, ideal for high-frequency applications like ArduPilot)
- Version 1.51 (supports up to 8Hz, compatible with the SSR service PointPerfect)
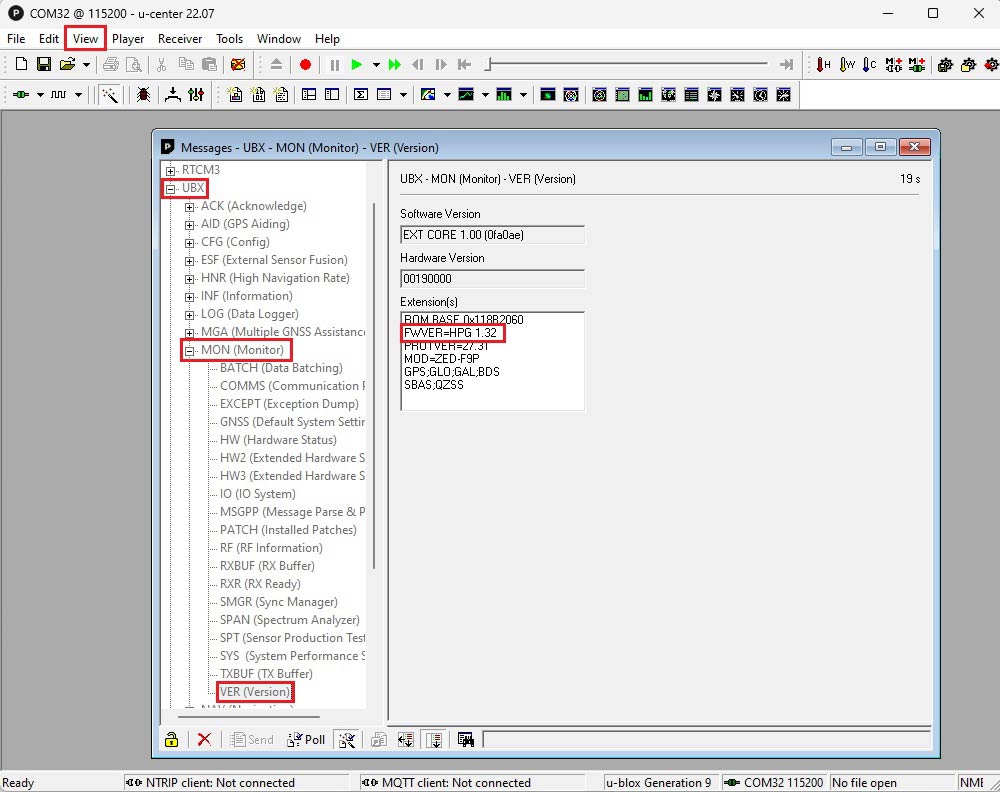
- You can check the firmware version of your receiver by going to View–>Message View–>UBX–>MON–>VER.
Firmware update
Depending on the moment of your order, boards can have different firmwares. For high-frequency applications, such as ArduPilot or monitoring small movements of a bridge, you will need to use firmware version 1.13 (available for download in step 7). In the following step we will show you how to update the firmware.
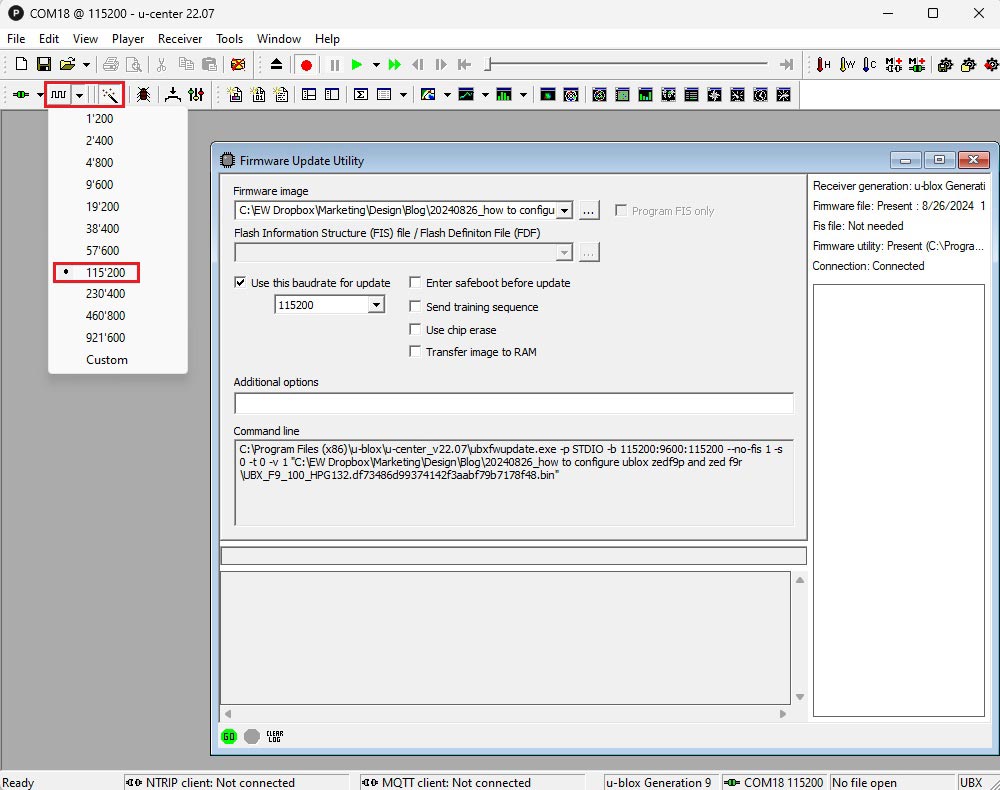
- Go to Tools–>Firmware Update…Make sure to select the options as shown in image below. (With simpleRTK2B Lite, the maximum baudrate is 115’200bps. So setting baudrate to 115200 will work for all our simpleRTK2B series boards).
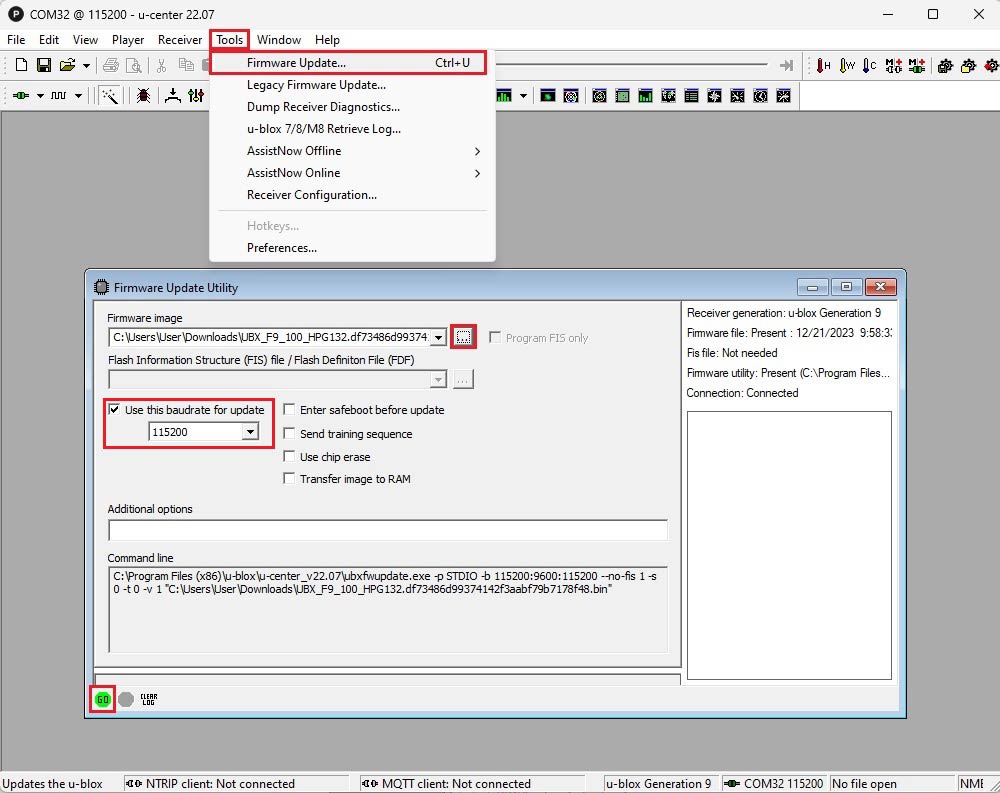
- If you have a simpleRTK2B Lite board, remember to set the baudrate on toolbar also to 115’200 and select the magic wand button.
Configure the receiver
Load a configuration file
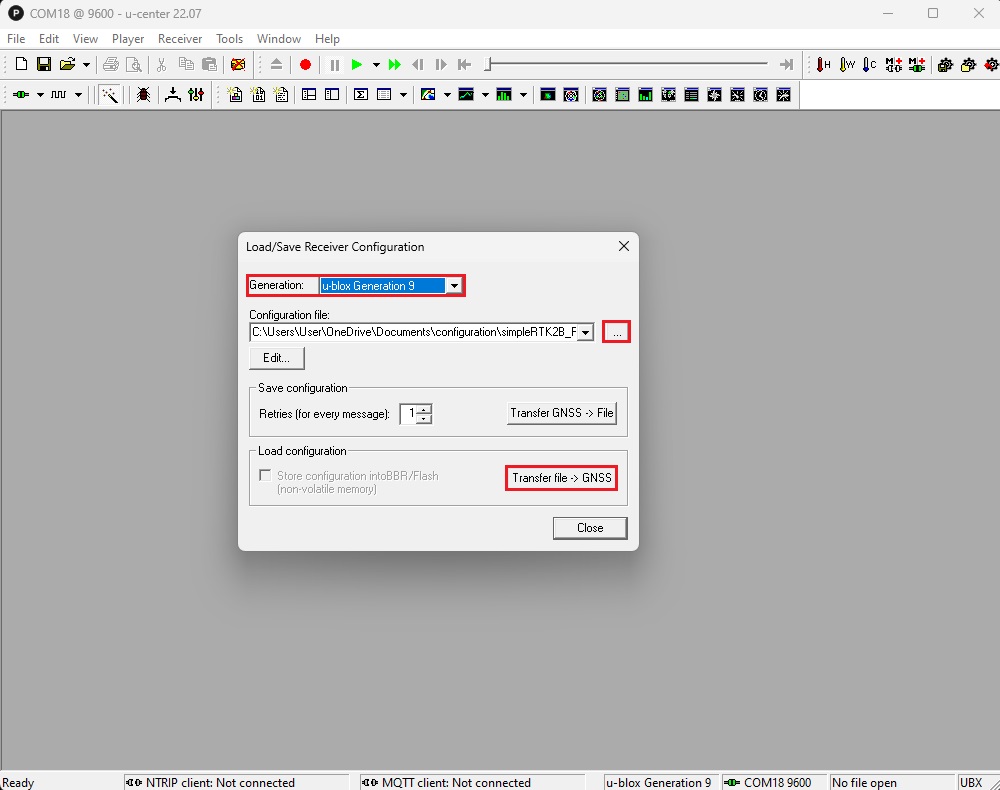
- At menu bar go to Tools–>Receiver Configuration…Select Generation u-blox Generation 9.Select the configuration file from your hard disk.Click Transfer file–>GNSS. NOTE for simpleRTK2B Lite users: when loading configuration files to simpleRTK2B Lite board, you are using UART1 (via USB with a UART-to-USB converter). The configuration files might change the baudrate you have on your board, leading to a loss of communication in the middle of the configuration file update. When this happens, just change the baudrate of u-center and load again the configuration file at the new baudrate.
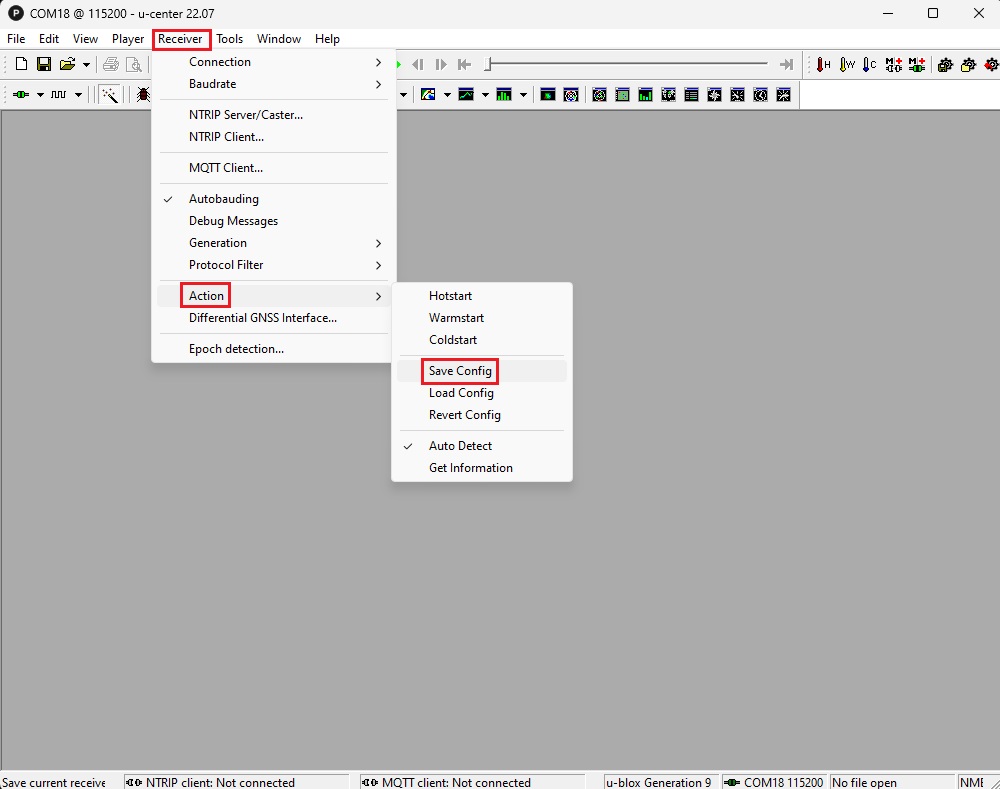
Save configuration
- When finished configuration, the simpleRTK2B will start using the new configuration immediately. But if you remove the power, it will revert back to the previous one.To permanently store our new configuration, in the menu bar, go to Receiver–>Action–>Save Config to save your configuration.
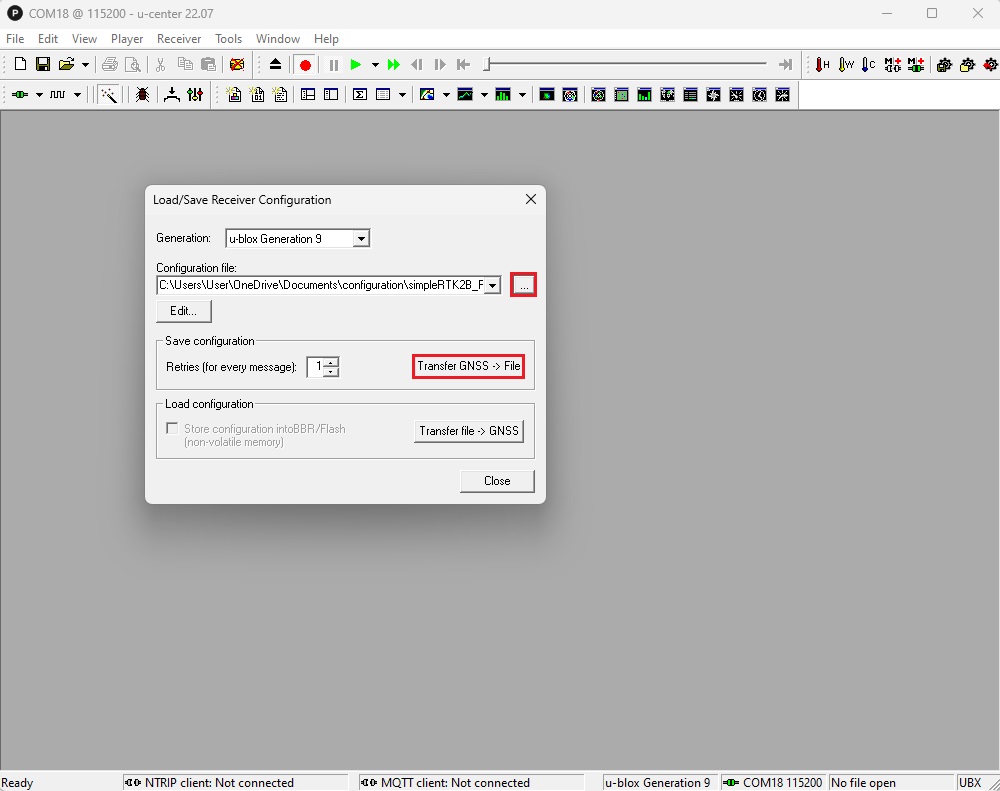
Create a configuration file
- To create the configuration file and save it as a local file, go to Tools–>Receiver Configuration… At Configuration file choose the folder and file name you want to save the configuration. Click Transfer GNSS–>File.
Examples of configuration file
We provide a variety of configuration files designed for different purposes, such as configuring as a base station, as a Rover, sending NMEA messages via Bluetooth or BLE, connecting to NTRIP correction via 4G NTRIP master, and enable RAW data for PPK. You can download the configuration file that fits your requirements by right-click and choose ‘Save link as’.
| Configuration | FW 1.51 | FW 1.13 | Details |
|---|---|---|---|
| Base It will set your receiver as a base station using the survey-in mode of u-blox. | File | File | Starting from a default ZED-F9P configuration: Enable survey-in with target accuracy 2.5m (should take no more than 5-10min) Change UART2 baudrate to 115kbps. This improves the buffer use of the radio links. Activate following RTCM messages 1005: Stationary RTK reference station ARP 1074: GPS MSM4 1084: GLONASS MSM4 1094: Galileo MSM4 1230: GLONASS code-phase We have selected this combination of messages because it's a good tradeoff between performance and required data link: Performance can be improved by using MSM7 messages RF Bandwidth can be improved by eliminated more constellations (e.g. remove Galileo), or increase 1005 to only be sent once every 5 seconds. |
| Rover 1Hz | File | File | Starting from a default ZED-F9P configuration: Change UART2 baudrate to 115kbps. This improves the buffer use of the radio links. Disable SBAS, to avoid position jumps during short RTK corrections interruptions. Disable BeiDou, to make it simpler to increase navigation rate to 10Hz without troubles. |
| Rover 5Hz | File | File | Starting from a default ZED-F9P configuration: Change UART2 baudrate to 115kbps. This improves the buffer use of the radio links. Disable SBAS, to avoid position jumps during short RTK corrections interruptions. Disable Beidou, to make it simpler to increase navigation rate to 10Hz without troubles. Disable GSV on UART to avoid buffer overflow Change navigation rate to 200ms |
| Rover 10Hz | FW 1.51 doesn't support 10Hz update rate | File | Starting from a default ZED-F9P configuration: Change UART2 baudrate to 115kbps. This improves the buffer use of the radio links. Disable SBAS, to avoid position jumps during short RTK corrections interruptions. Disable Beidou, to make it simpler to increase navigation rate to 10Hz without troubles. Disable GSV on UART to avoid buffer overflw Change navigation rate to 100ms |
| Send NMEA messages to communication plugin Enable NMEA on COM2 of the receiver, allowing you to connect the receiver to your mobile device via Bluetooth, BLE, or use radio and other communication plugins on Xbee socket. | File | File | Starting from a default ZED-F9P configuration: Disable SBAS, to avoid position jumps during short RTK corrections interruptions UART2 activate NMEA output via UBX-CFG-PRT and change baudrate to 115'200bps Activate GST so accuracy estimates are also visible Enabled High Precision NMEA with one extra decimal digit Enable SPARTN mode for PP compatibility (only on fw v1.51) |
| Rover 1Hz with 4G NTRIP Client (sending NMEA-GGA) This configuration file allow connection to NTRIP client with VRS mountpoints. | File | File | Starting from a default ZED-F9P configuration: Change UART2 baudrate to 115kbps. This improves the buffer use of the radio links. Disable SBAS, to avoid position jumps during short RTK corrections interruptions. Disable Beidou, to make it simpler to increase navigation rate to 10Hz without troubles. Enable UART2 Protocol Out to NMEA NMEA-GGA as output on UART2 to allow compatibility with VRS mountpoints Disable the rest of NMEA messages on UART2 Only on FW v1.51 RTCM+SPARTN+UBX are enabled as Protocol In on both UART1 and UART2 |
| RAW data (PPK) over UART1 & USB at 1Hz | File | FW 1.13 does not support exporting PPK raw data | NMEA messages disabled on UART1 and baudrate changed to 115'200 bps. UART1, UART2 and USB output UBX-RXM-RAWX and UBX-RXM-SFRBX. |
Get RTK corrections
Base and Rover setup
- With a Base and Rover setup, you will need two receivers: one configured as a Base and the other configured as a Rover. They will communicate with each other via radio. Alternalively, you can use our pre-configured Base+Rover Kits.
NTRIP corrections
NTRIP via PC
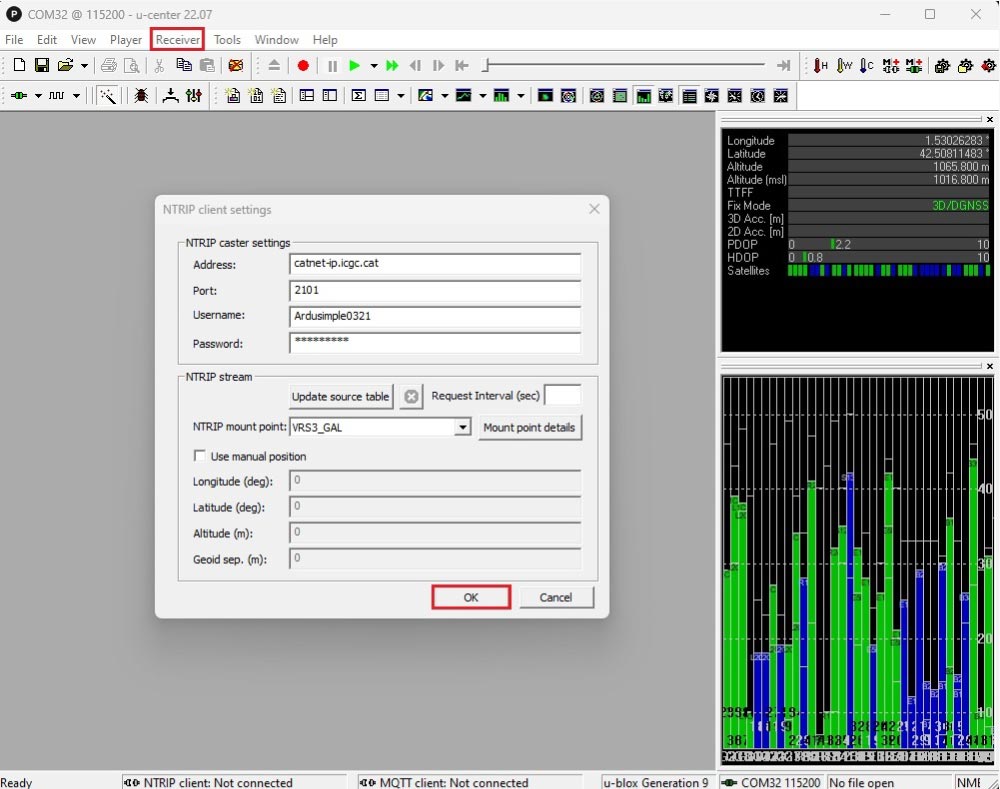
- At menu bar go to Receiver–>NTRIP Client… Set up the Address, Port, Username, Password and Mount point of your NTRIP. Click OK.
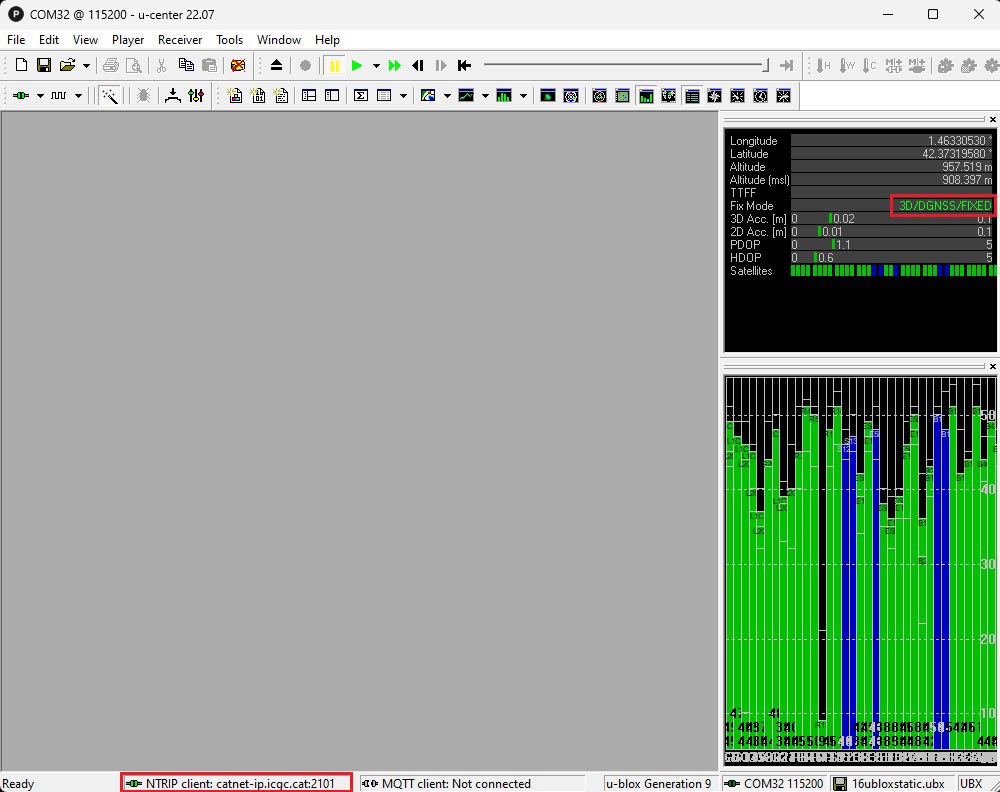
- In a few minutes, you will see the Fix Mode change to FIXED or FLOAT. At the bottom of the screen the NTRIP client icon will turn green. With valid FIXED you should see the 3D Acc.(accuracy) and 2D Acc. are centimeter-level.
NTRIP via smartphone or tablet
- You can also connect to NRTIP using your mobile device, which is convenient for fieldwork. For more information, check our tutorial How to use centimeter GPS with any Android app (Mock location).
NTRIP via communication plugin
- You can also connect to NRTIP correction with one of our communication plugin below. For more information, check the User Guide of each product.
- Sale!
 Plugins
4G NTRIP Master
156,00€ This product has multiple variants. The options may be chosen on the product page - Sale!Made in Europe
-
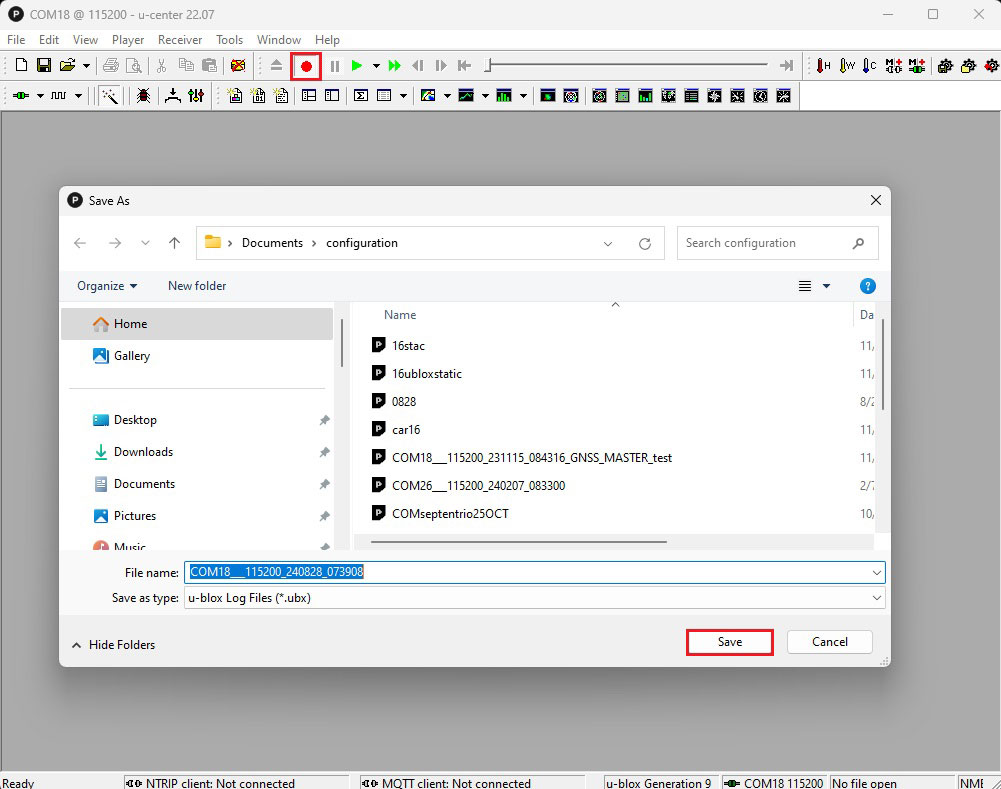
Log data and replay
- Click the record button in the toolbar, then select the folder and filename where you want to save the logfile. Click Save.
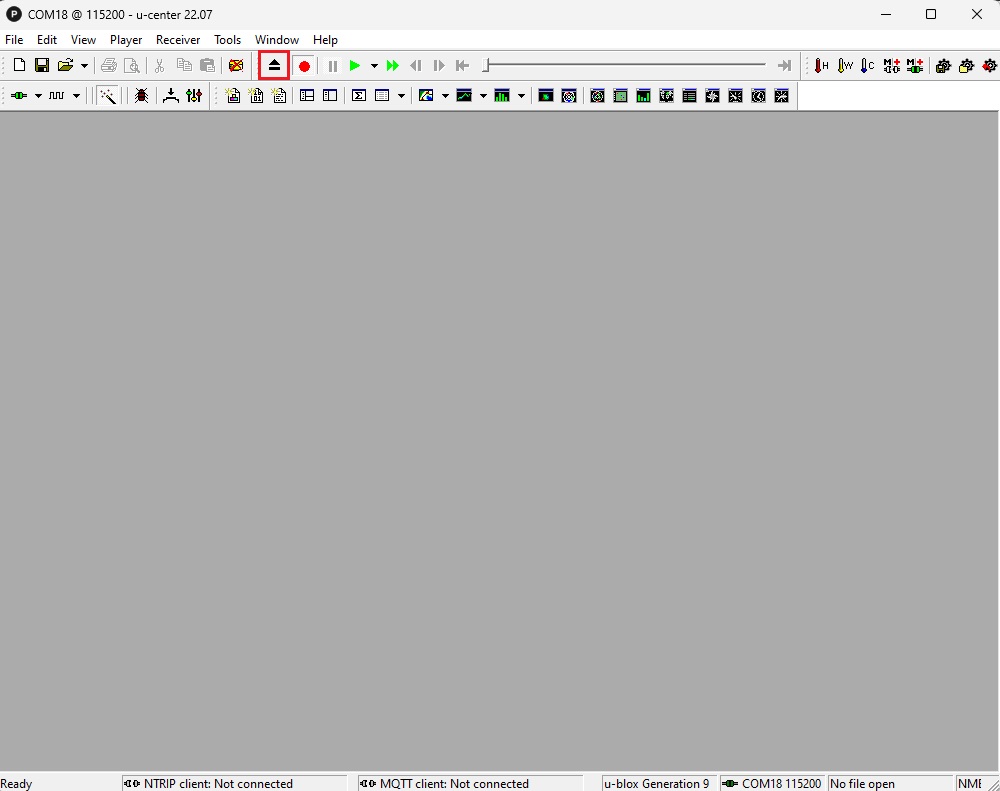
- To stop recording, simply click the eject button in the toolbar.
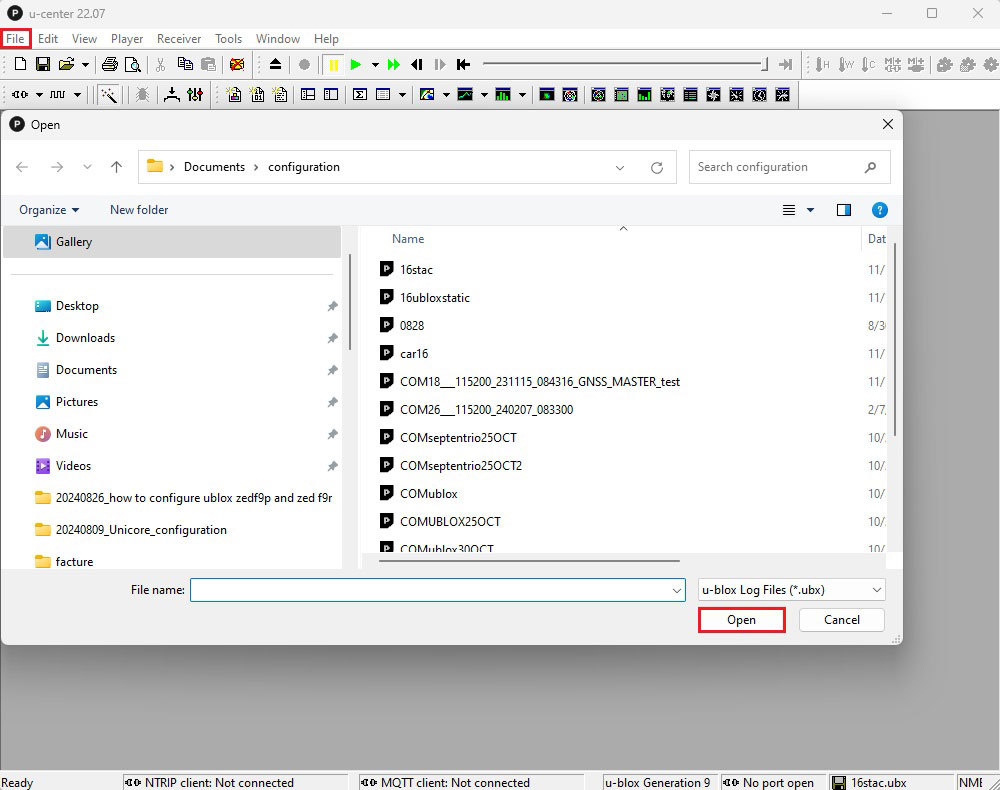
- To replay a log file, go to File–>Open. Select the log file, then click Open.
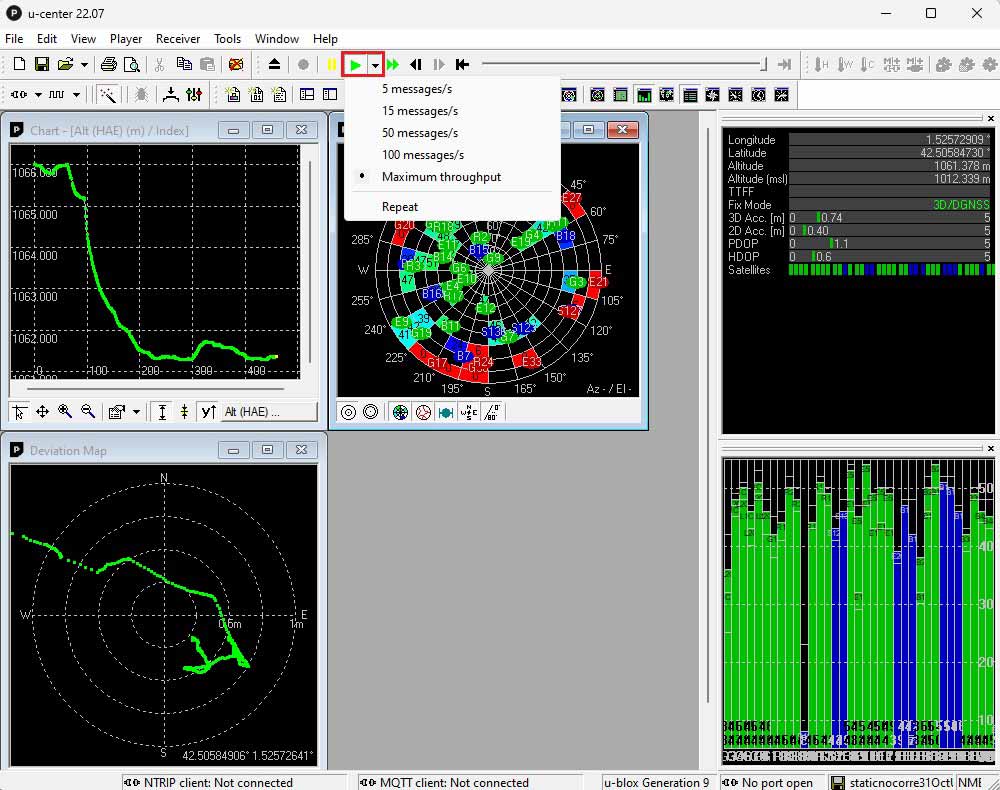
- Click the play icon to start playback. You can adjust the replay speed as needed. In the view toolbar, you can select the data you are interested in.
U-blox Documentation
- Sale!Made in EuropeRTK starter kits
Medium Range Radio – RTK Starter Kit
512,00€Original price was: 512,00€.499,00€Current price is: 499,00€. - RTK2B Boards
simpleRTK2B Micro
From 199,00€ This product has multiple variants. The options may be chosen on the product page - RTK2B Boards
simpleRTK2B Pro
From 226,00€ This product has multiple variants. The options may be chosen on the product page

