 and
and 

How to configure Unicore UM980, UM981 and UM982
Introduction
This page is only valid for simpleRTK3B Budget (UM980), simpleRTK3B Fusion (UM981) and simpleRTK3B Compass (UM982) based on Unicore module.
Install Uprecise
You can download UPrecise software here. It is a ZIP folder. The unzip password is 1234.
Once downloaded, select the executable file and follow the prompts to install the software to your computer. Note that the software is currently only supported on Windows 7/8/10, 64-bit OS. The software will be in Chinese by default, you can switch to English as shown in the image below.

Connect to UPrecise
- Connect the GNSS antenna to your receiver. Make sure the antenna has a good view of the sky for testing functionality. Otherwise, you won’t be able to see satellite signals.
- Connect the receiver to your PC via the USB port labelled as POWER+GPS.
- Open Uprecise. Select the COM port (if you don’t know which COM port, check the Device Manager on your PC). At baud rate choose 115200 or AUTO. Press Connect.
Configure the receiver
Configure with commands
You can simply copy and past the following commands on Uprecise or other terminal tools to configure the receiver.
| Configuration | Commands |
|---|---|
| Base Use self-optimize to access base station mode with maximum duration 120s range of distance limit 2.5m. | mode base time 120 2.5 gngga 1 gngsv 1 gngsa 1 gpgst 1 gnrmc 1 RTCM1006 COM2 10 RTCM1033 COM2 10 RTCM1074 COM2 1 RTCM1084 COM2 1 RTCM1094 COM2 1 RTCM1114 COM2 1 RTCM1124 COM2 1 RTCM1230 COM2 10 saveconfig |
| Rover 1Hz | mode rover gngga 1 gngsv 1 gngsa 1 gpgst 1 gnrmc 1 saveconfig |
| Rover 20Hz | mode rover gngga 0.05 gnrmc 0.05 gpgst 0.05 gngsv 1 gngsa 1 saveconfig |
| Send 1Hz Full NMEA to Plugin This configuration allows you to connect the receiver to your mobile device via Bluetooth, BLE, or use radio and other communication plugins on Xbee socket. | mode rover gngga 1 gngsv 1 gngsa 1 gpgst 1 gnrmc 1 gngga com2 1 gpgst com2 1 gngsv com2 1 gngsa com2 1 gnrmc com2 1 gnvtg com2 1 saveconfig |
| Send 1Hz GGA to Plugin To use the VER function find the nearest mount point. | mode rover gngga 1 gngsv 1 gngsa 1 gpgst 1 gnrmc 1 gngga com2 1 saveconfig |
Configure with user interface
You can also use the Uprecise user interface to configure the receiver.
Enable NMEA messages
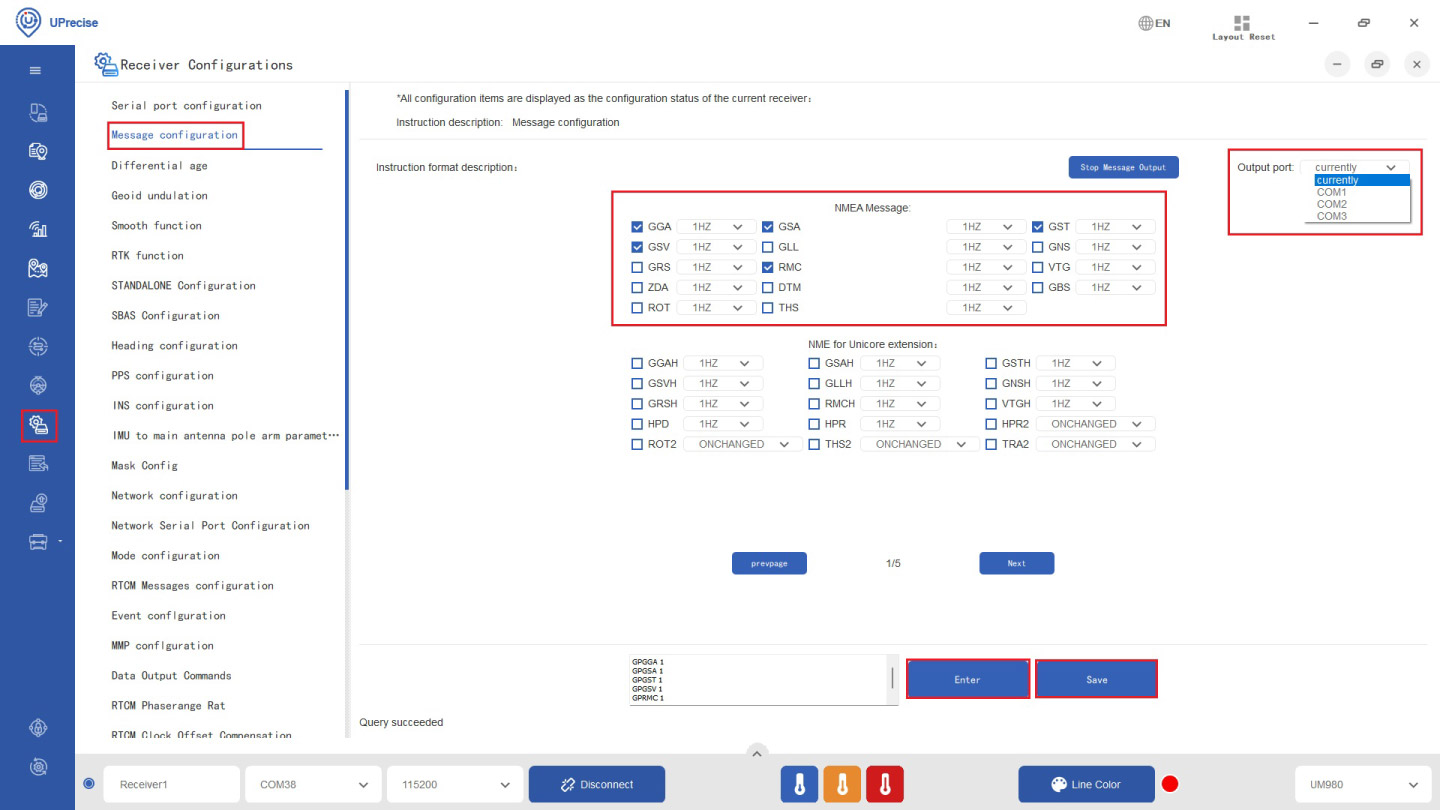
- By default NMEA is disabled on Unicore module. You can enable your preferred NMEA messages by clicking the Receiver Configuration icon on the right side menu bar. We recommend checking GGA, GSA, GSV, GST and RMC. It will work well with SW Maps and most applications.At Output port, can choose the output interface.
Select currently, which is the interface you are connected to UPrecise.- If you want to send messages via a communication plugins(such as Bluetooth, radio, WiFi ect.) through the Xbee socket, also enable the messages on COM2
- If you want to connect to a Ardupilot via the Pixhawk connector, also enable messages at COM3.
Then click Enter. In a few seconds you will see the Constellation, Data Steam and Tracking Status on the screen.
Configure as a Base
- Mode base: use pre-determined, known coordinates for the base station.
You can refer to tutorial How to determine the exact position of your base station, which uses Septentrio module, but the theory and steps are similar.
The absolute accuracy of your rover can reach to 1-2cm.
Example where Fixed position is a good choice: In autonomous vehicle navigation, the vehicle needs to know its precise location within a global reference frame to navigate accurately. - Self-optimize: when the coordinates of base station are unknown, users can set the receiver to automatically positioning for a period of time and get the average value as the coordinates of the base station (similar as Survey-in mode of Ublox).
The absolute accuracy your rover will get from this method will be around 1-2m. But relative accuracy can reach 1-2 cm.
Example where Self-optimize is a good choice: In land surveying, the precise measurement of the distance between two points on the ground is more important than the absolute position of those points.
- Go to Receiver Configuration–>Mode configuration.
- If you know the coordinates of your base station, check Mode base. Then type in the coordinates.
- If you don’t know the coordinates, check Self-optimize to access base station mode. Enter calculate the maximum duration of the average position and range of distance limit.
- Click Enter.

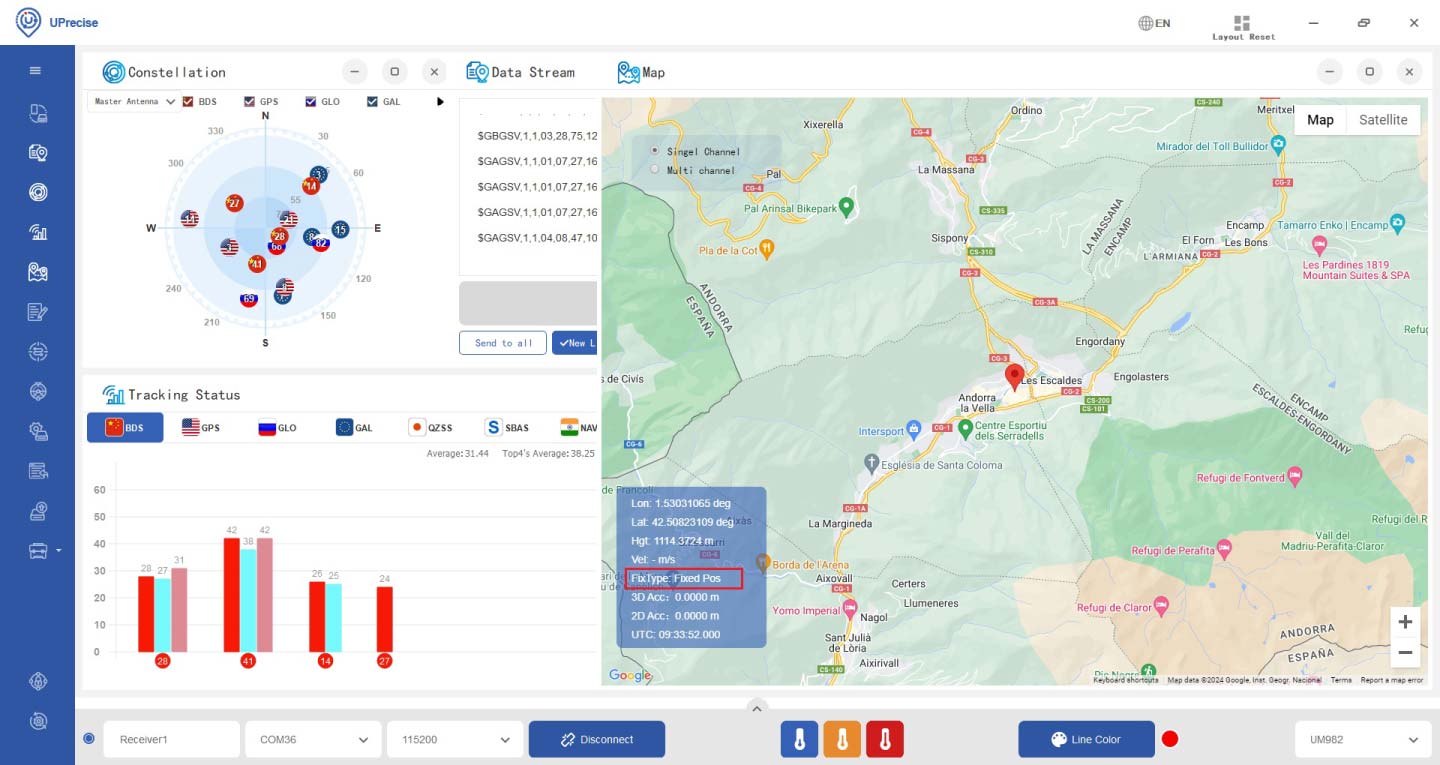
- After finishing calculation, you will see the FixType change to Fixed Pos.
- Configure the output RTCM correction data at COM2 by typing the following commands at Command Entry Box: RTCM1006 COM2 10 RTCM1033 COM2 10 RTCM1074 COM2 1 RTCM1084 COM2 1 RTCM1094 COM2 1 RTCM1114 COM2 1 RTCM1124 COM2 1 saveconfig
Configure as a Rover
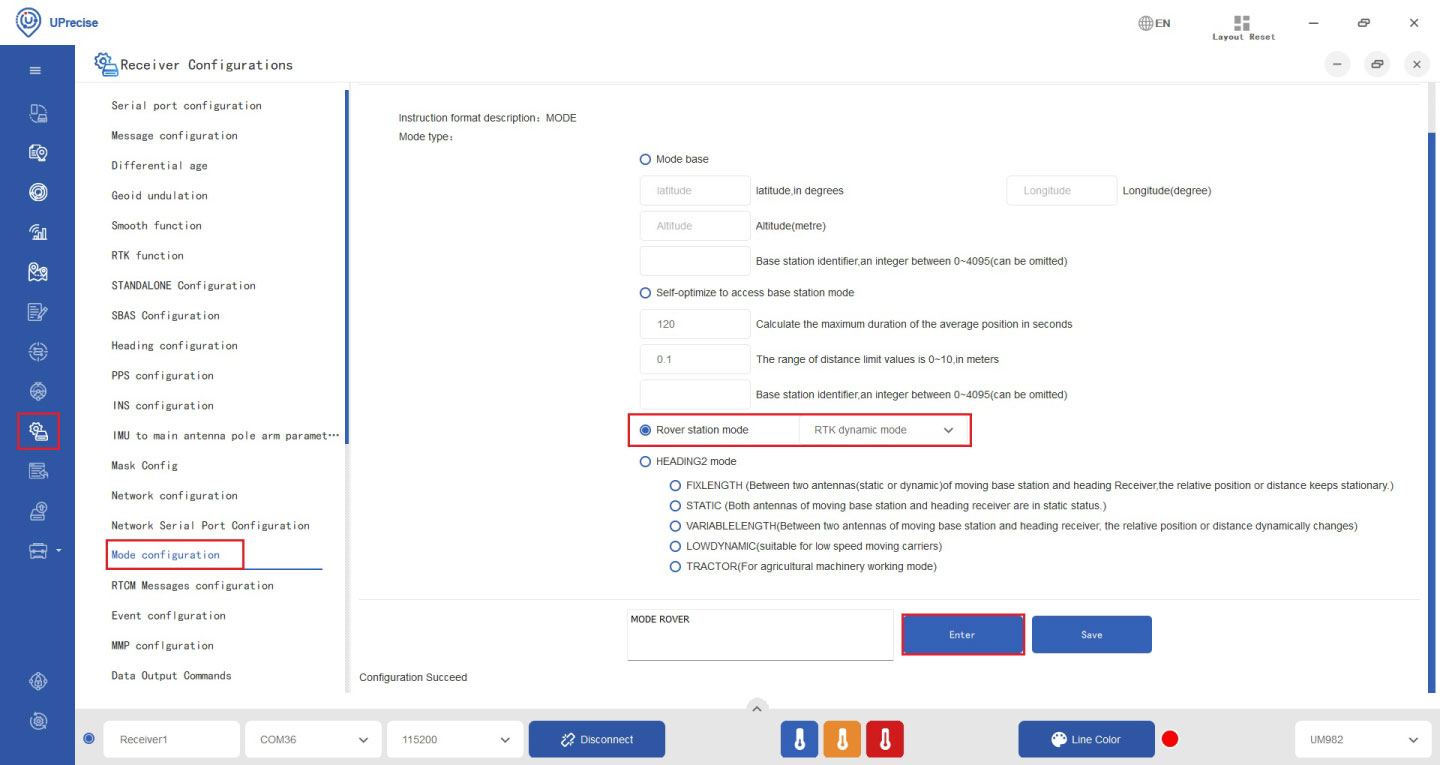
- At menu Receiver Configuration–>Mode configuration–>Mode type check Rover station mode, choose RTK dynamic mode. Then click Enter.
Save configuration and reset to default
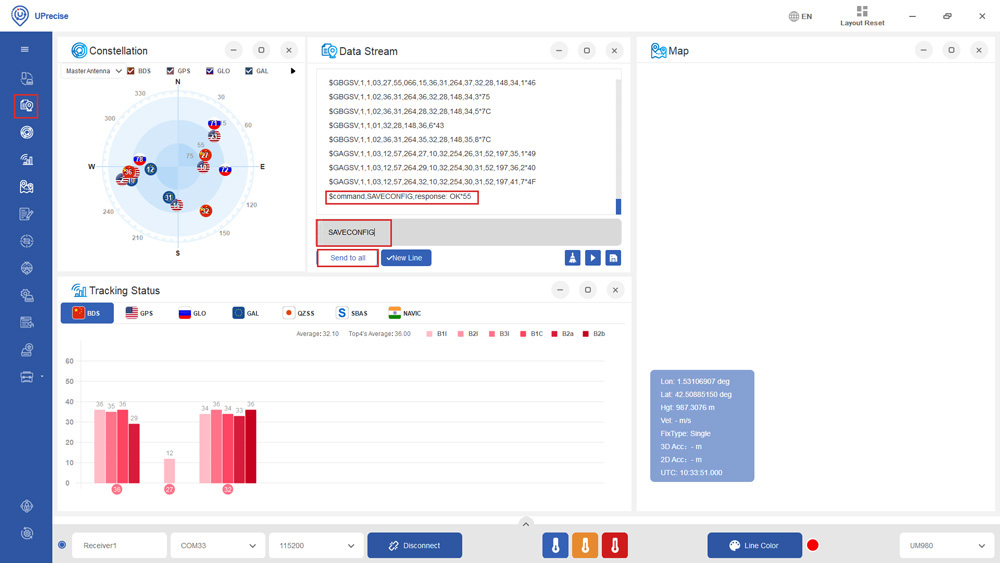
- At Menu bar choose the Data Stream icon. At Data Stream window type in SAVECONFIG and press Enter. On the Data Stream you will see Command, SAVECONFIG, response: OK. It means your configuration is saved to the Flash of your receiver.
- At Data Stream window type in FRESET and press Enter. This command is used to clear all user-specified configurations, satellite ephemerides, and position information stored in the non-volatile memory (NVM), and reset the baud rate to 115200 bps. This command will force a restart of the receiver.
Enable all bands
- Unicore provides configurable signal groups (check table below) for their receivers to enable support for multiple GNSS bands. By default, each model is pre-configured with a specific signal group to suit common use cases. However, to enable all available GNSS bands, including Galileo E6, the signal group configuration must be adjusted.The default signal group for the UM980 and UM981 is 1, while for the UM982, it is 4 for the Master antenna and 5 for the Slave antenna. To enable all bands, including Galileo E6, you will need to change the signal group configuration.
- For UM980 and UM981 users, use the command: CONFIG SIGNALGROUP 2
- For UM982 users, use the command: CONFIG SIGNALGROUP 3 6
- We also recommend setting the RTK mode to multiconstellation, to only get reliable RTK FIXES from the receiver: CONFIG PVTALG MULTI
| Signal Group Number | Supported GNSS Bands |
|---|---|
| 0 | Disable the slave antenna |
| 1 | BDS: B1I, B2I, B3I, B1C, B2a, B2b GPS: L1C/A, L2C/L2P, L5 GLO: G1, G2 GAL: E1, E5a, E5b QZSS: L1C/A, L2C, L5 |
| 2 | BDS: B1I, B2I, B3I, B1C, B2a, B2b GPS: L1C/A, L1C, L2C, L2P(Y), L5 GLO: G1, G2, G3 GAL: E1, E5a, E5b, E6 QZSS: L1C/A, L1C, L2C, L5 NavIC: L5 |
| 3 | BDS: B1I, B3I, B1C, B2b-PPP GPS: L1C/A, L2C/L2P, L5 GLO: G1, G2 GAL: E1, E5a, E5b, E6 QZSS: L1C/A, L2C, L5 |
| 4 | BDS: B1I, B2I, B3I GPS: L1C/A, L2C/L2P, L5 GLO: G1, G2 GAL: E1, E5a, E5b QZSS: L1C/A, L2C, L5 |
| 5 | BDS: B1I, B2I, B3I GPS: L1C/A, L2C/L2P GLO: G1, G2 GAL: E1, E5b QZSS: L1C/A, L2C |
| 6 | BDS: B1I, B3I GPS: L1C/A, L2C/L2P GLO: G1, G2 GAL: E1, E5b QZSS: L1C/A, L2C |
| 7 | BDS: B1I, B2I, B3I, B1C, B2a, B2b GPS: L1C/A, L2C/L2P, L5 GLO: G1, G2 GAL: E1, E5a, E5b QZSS: L1C/A, L2C, L5 |
| 8 | GPS: L1C/A, L2C/L2P, L5 BDS: B1I, B3I, B1C, B2a GAL: E1, E5a, E5b |
| 9 | BDS: B1I, B2I, B3I, B1C, B2a, B2b GPS: L1C/A, L2(Y)/L2C, L5 GLO: L1C/A, L2C/A GAL: E1C, E5A, E5B QZSS: L1C/A, L2C, L5 |
Get NTRIP corrections
Third-party NTRIP servise can be found through RTK Correction Services in your Country.
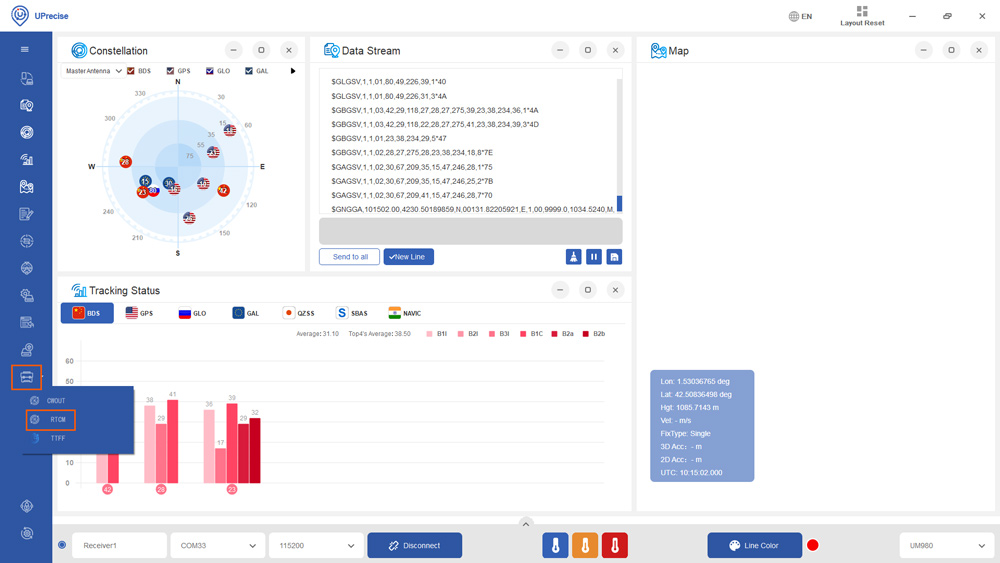
- Click the toolbox icon and select RTCM.
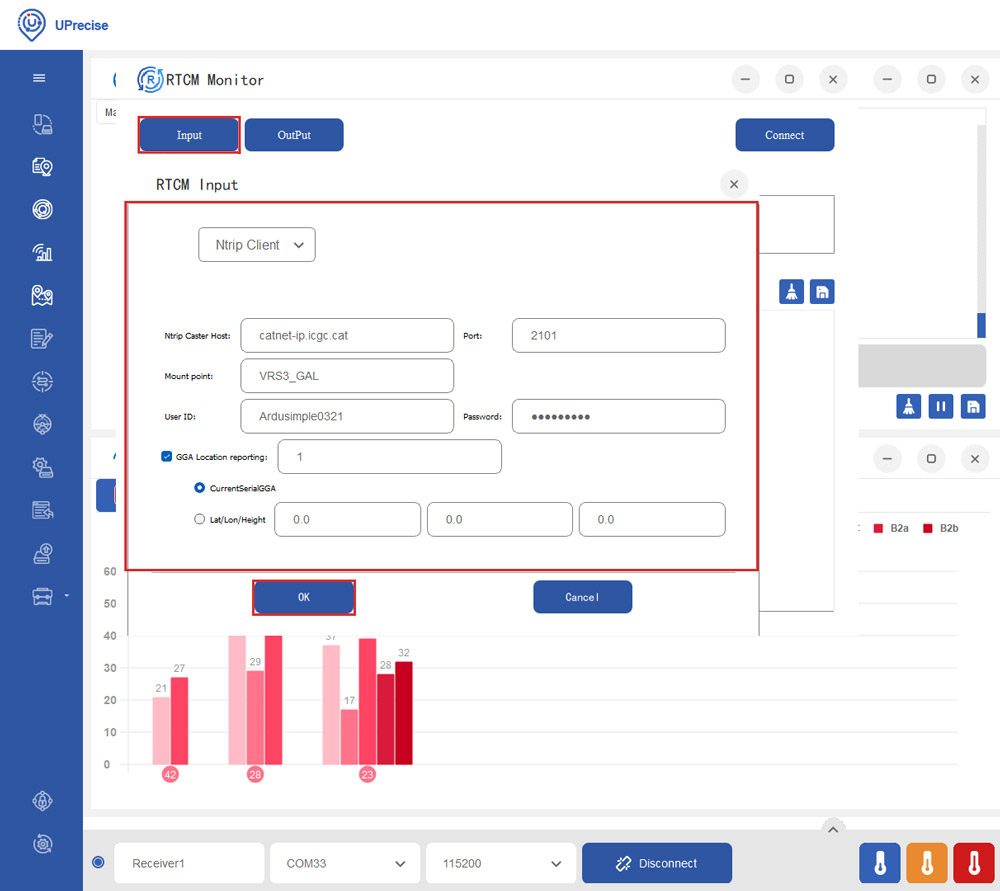
- Click Input. Choose Ntrip Client. Set your Ntrip Caster Host, Port, Mount point, ID and Password. If your Ntrip Caster need the location of your rover, set GGA Location reporting at 1, and select CurrentSerialGGA. Click Ok.
- Click the OutPut. Select Serial Port, and choose the COM port of your receiver.
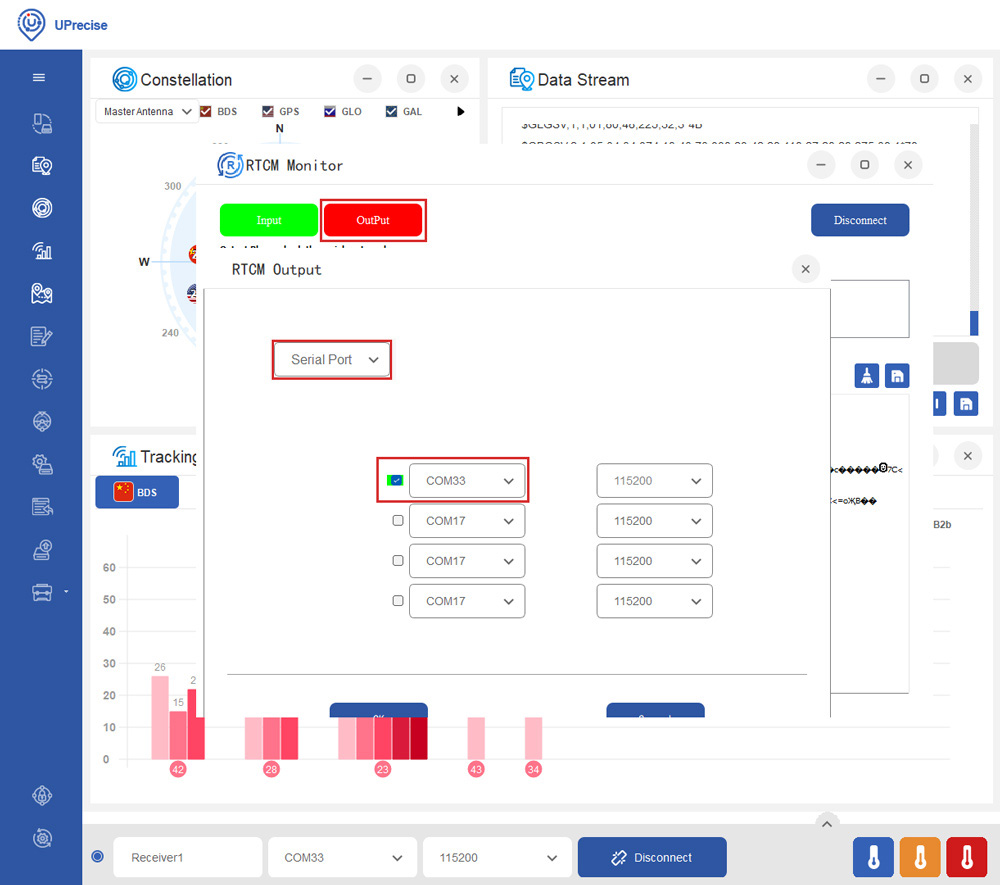
- You will see the Input and OutPut change into green. Check Hex, you will see the RTCM messages from the server.

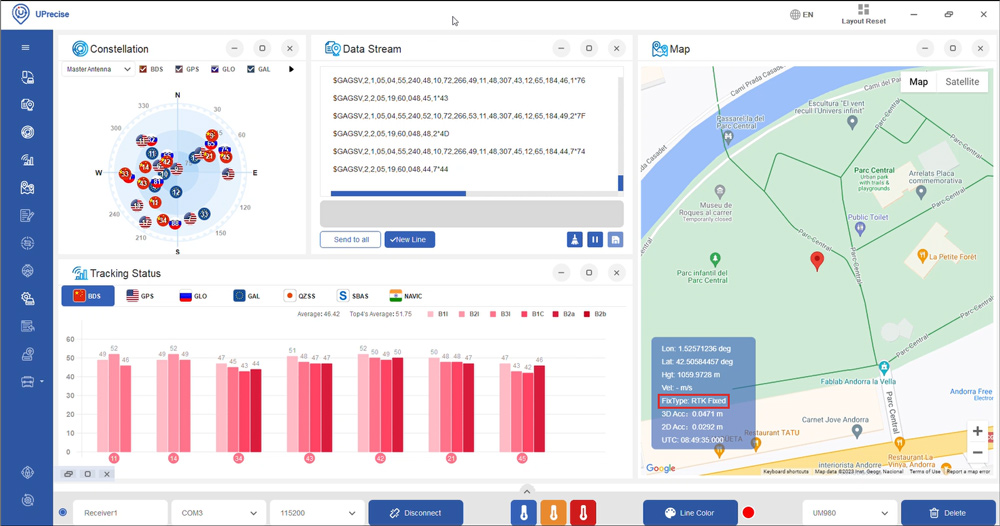
- In a few minutes, you will see the Fix Type change to RTK Float or Fixed.
Enable Galileo HAS
The Galileo High Accuracy Service (HAS) provides free of charge access, through the Galileo signal (E6-B) and by terrestrial means (Internet), to the information required to estimate an accurate positioning solution using a Precise Point Positioning algorithm in real-time.
simpleRTK3B Budget (UM980) and simpleRTK3B Compass (UM982) support PPP including E6 HAS and BDS B2b.
simpleRTK3B Fusion (UM981) supports BDS B2b. E6-HAS will be supported in future firmware version.
- Go to Receiver Configuration–>PPP function. Check your preferred PPP signal. Click Enter.
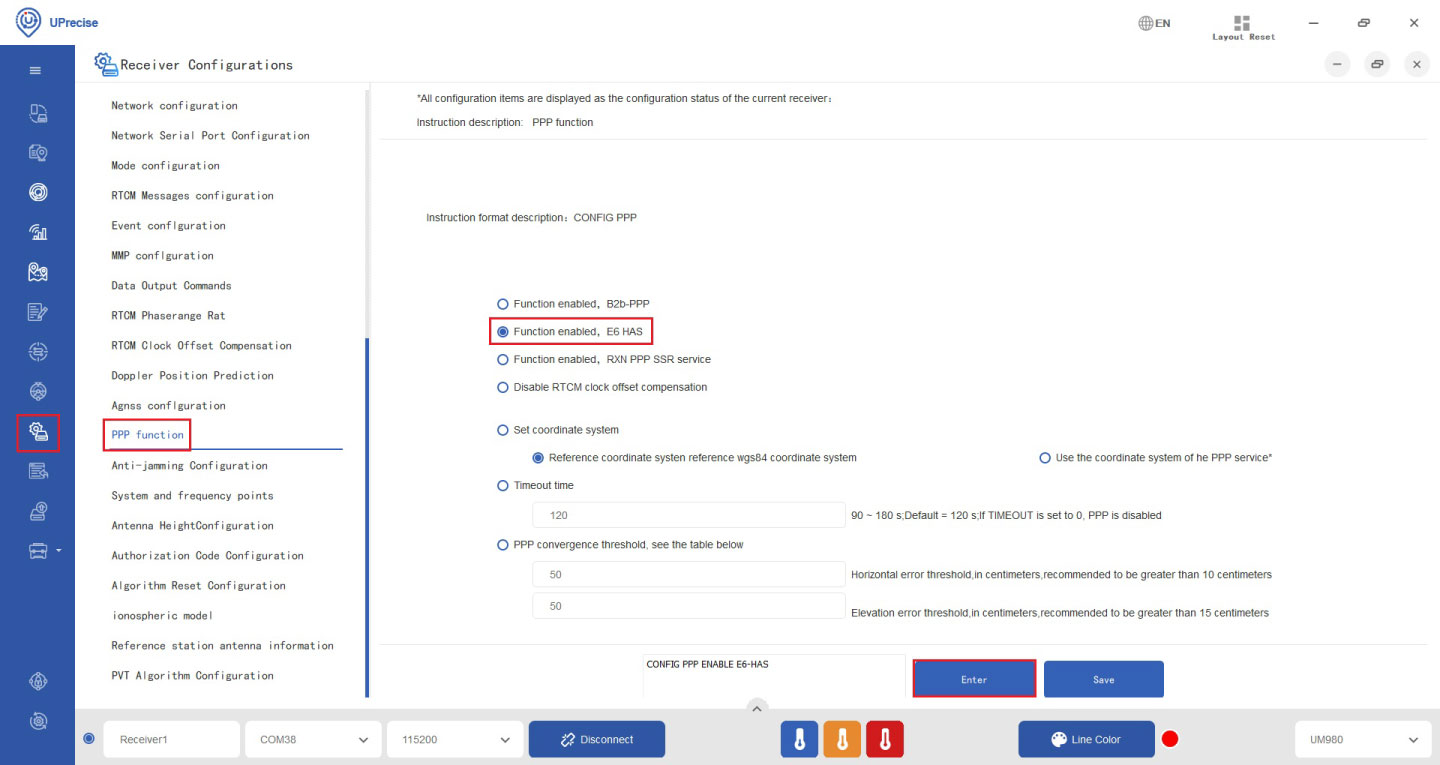
- Click Set Coordinate system, choose Reference coordinate system reference wgs84 coordinate system.
PPP services may provide coordinates in global systems such as the International Terrestrial Reference Frame (ITRF), which can differ slightly from WGS84. Unless you are certain of the specific coordinate system that the PPP service is using, it is advisable to default to WGS84.
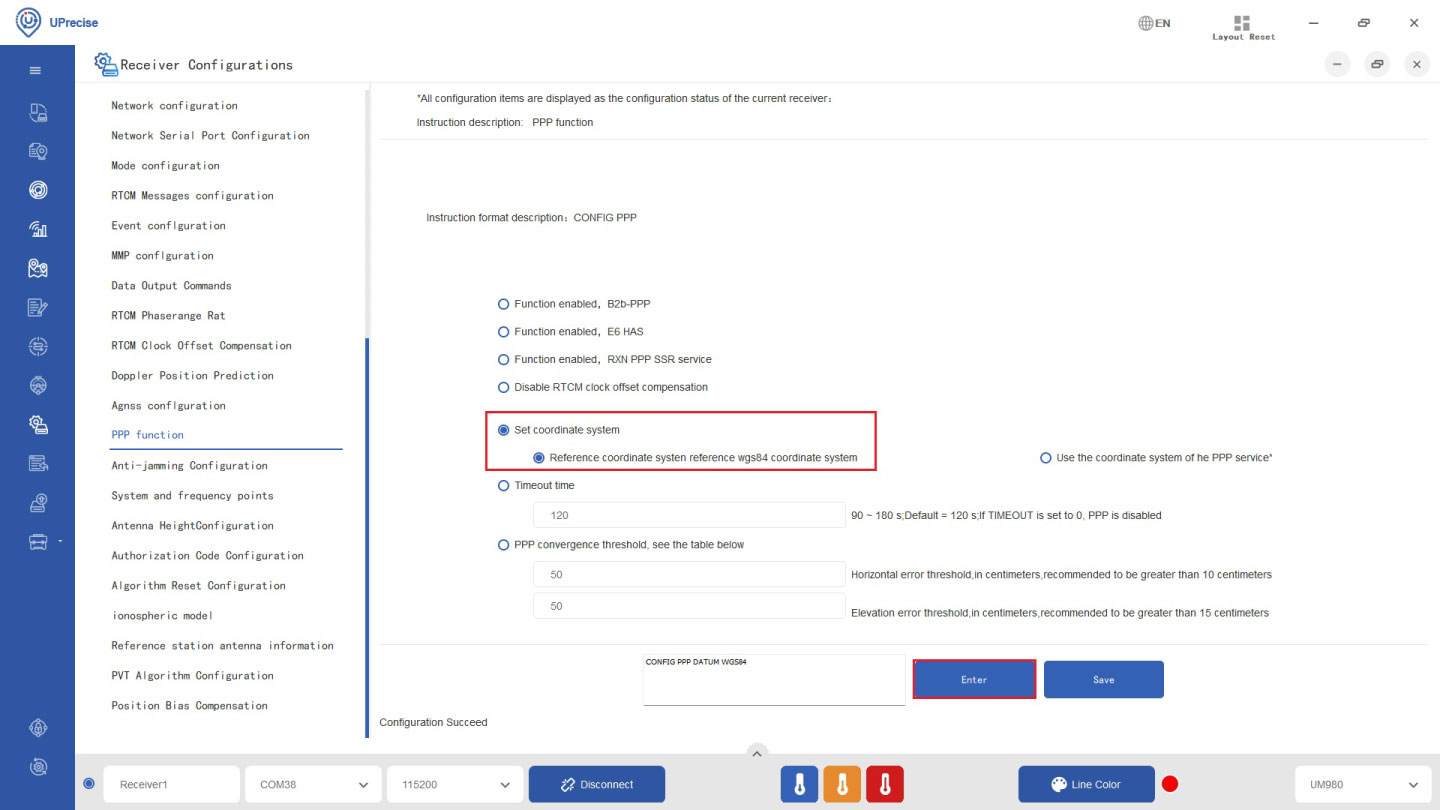
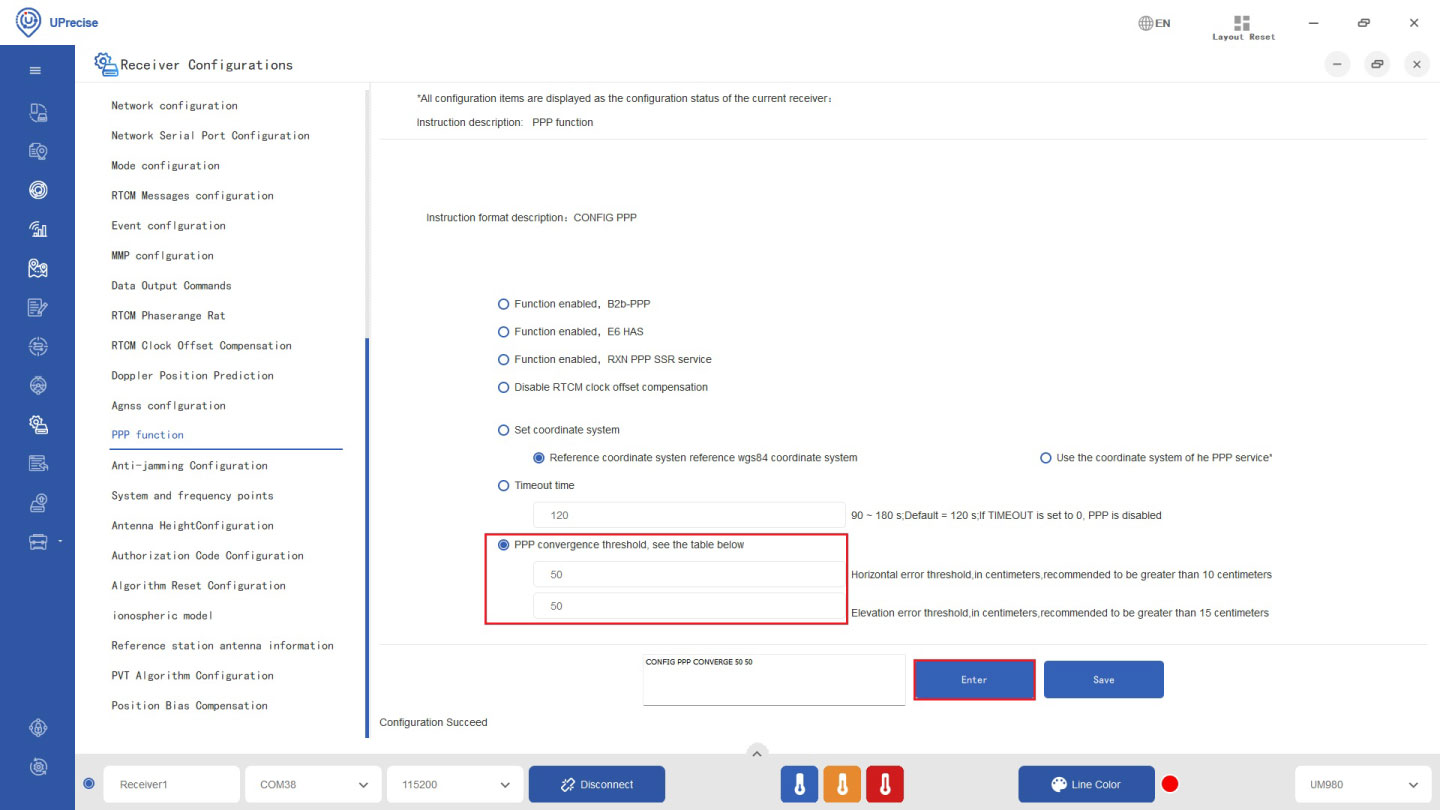
- Click PPP convergence threshold. Set both thresholds at 50 cm. Click Enter.
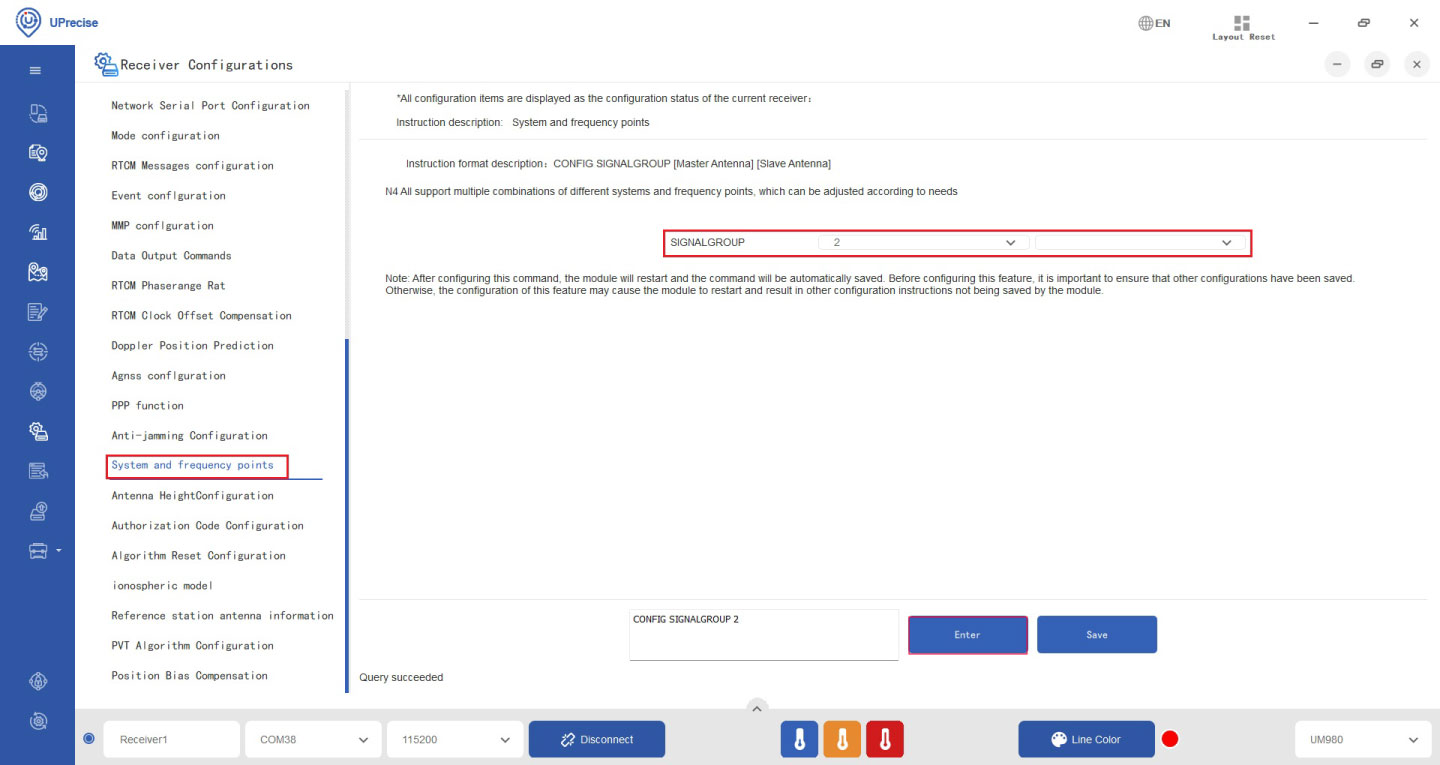
- Go to System and frequency points.
- If you are using simpleRTK3B Budget or Fusion, at SIGNAL GROUP choose 2.
- If you are using simpleRTK3B Compass, at SIGNAL GROUP choose 3 and 6.
- In a few minutes you should see the fix type change to Float. Save your configuration by using the command saveconfig.
Heading Configuration
This section applies only to users of the simpleRTK3B Compass. It does not apply to users of the simpleRTK3B Budget or Fusion models.
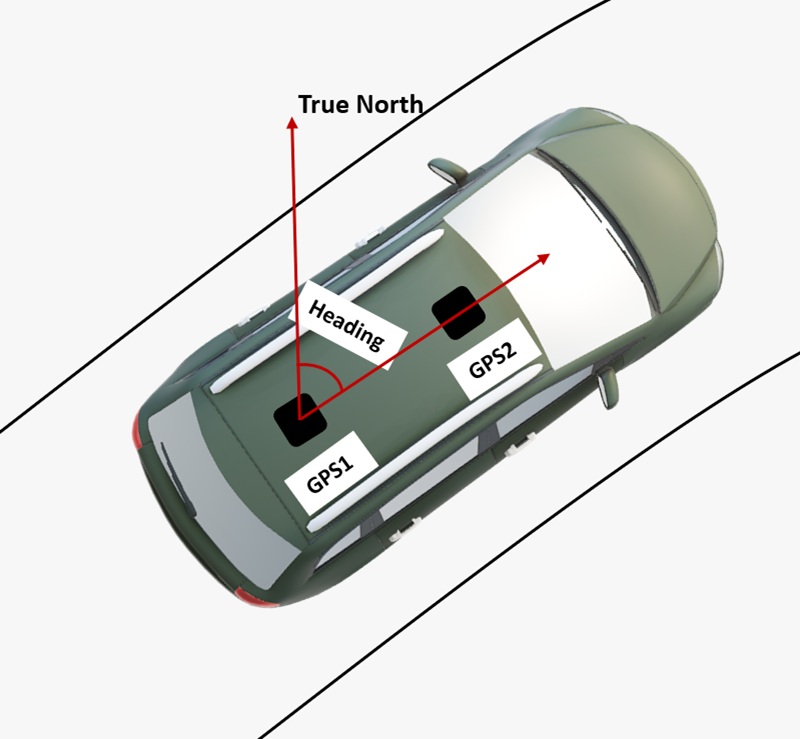
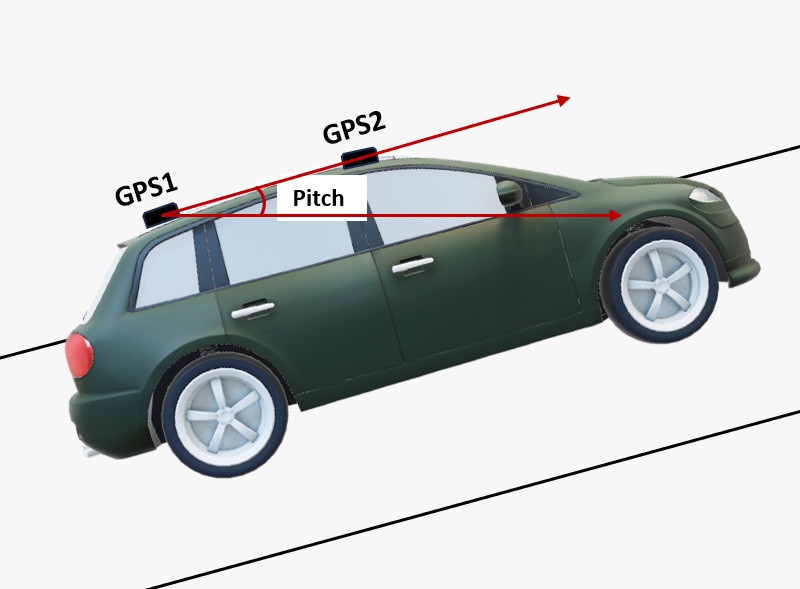
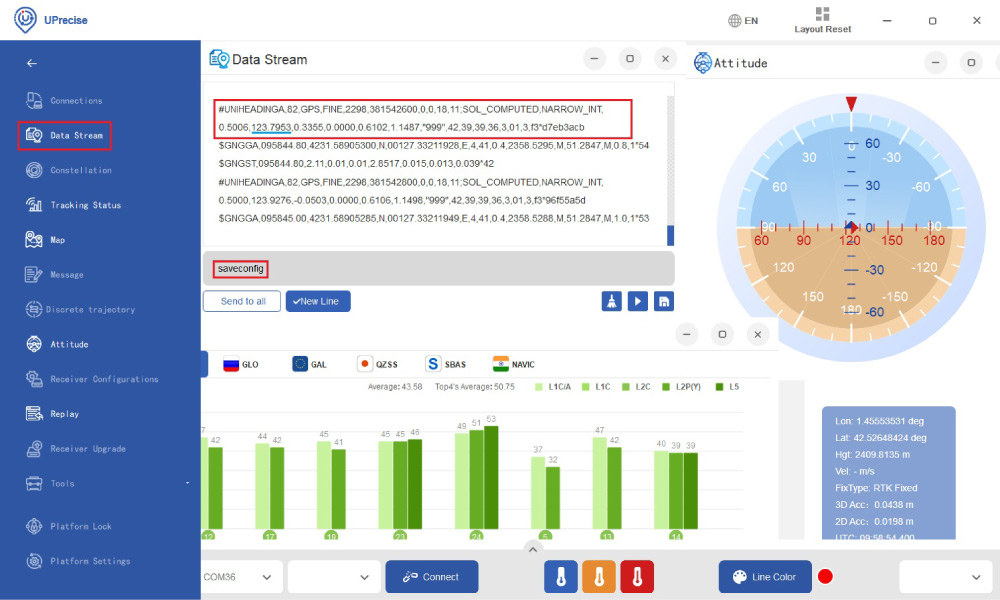
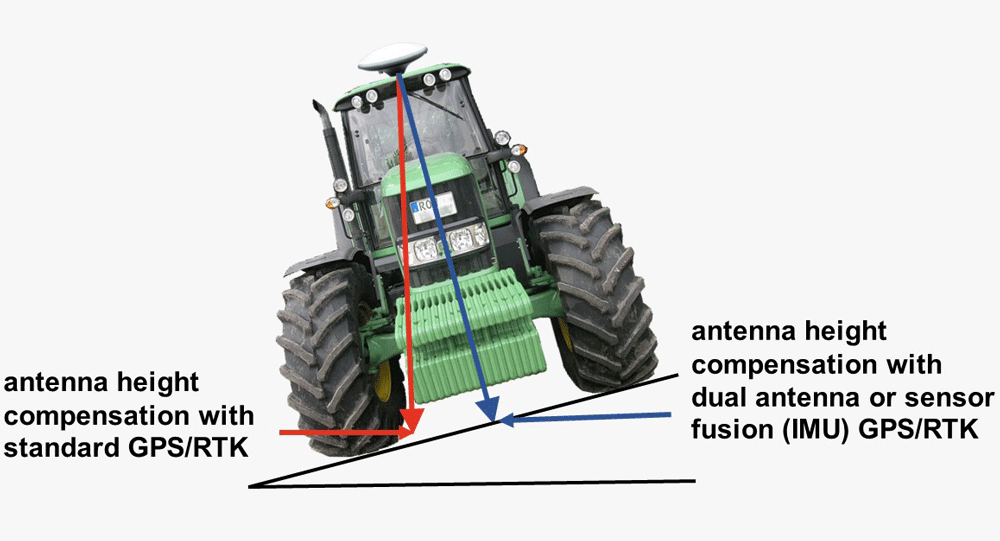
- The simpleRTK3B Compass can function as a typical GPS, providing location coordinates when connect single antenna at master antenna connector (labeled as GPS1 ). When connected to dual antennas, it can also provide heading and pitch information. Unicore heading result is the angle from True North to the Baseline of the master antenna (labelled as GPS1 on board) to the slave antenna (labeled as GPS2) in a clockwise direction. Pitch angle refers to the angle of the car or drone relative to the horizontal plane.
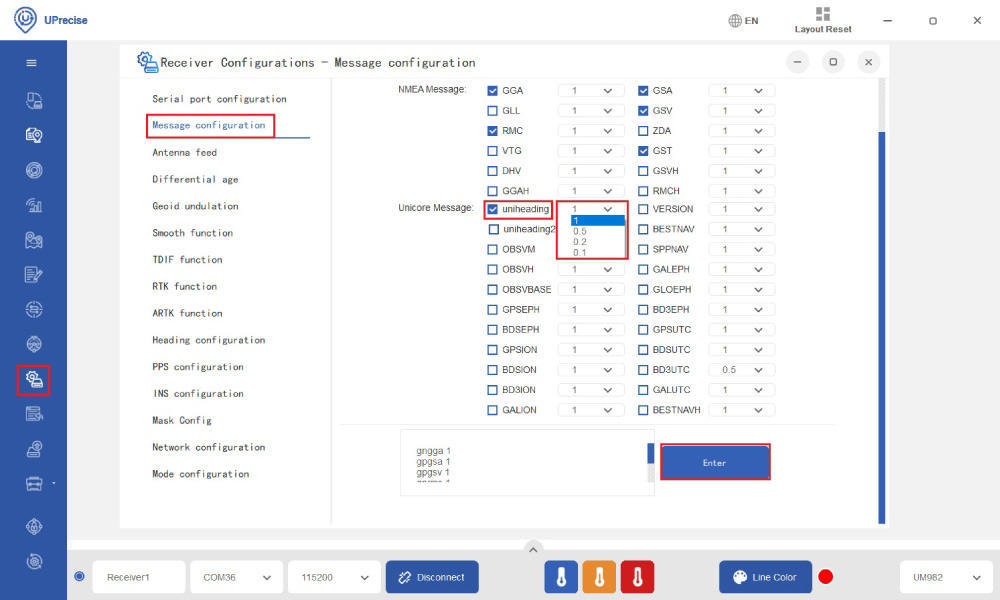
- To enable heading message, go to Receiver Configuration–>Message configuration–>Unicore Message. Check uniheading. You can select the frequency in the drop-down menu. For example, 0.2 means sending message every 0.2 seconds, which is 5 Hz. Click Enter.
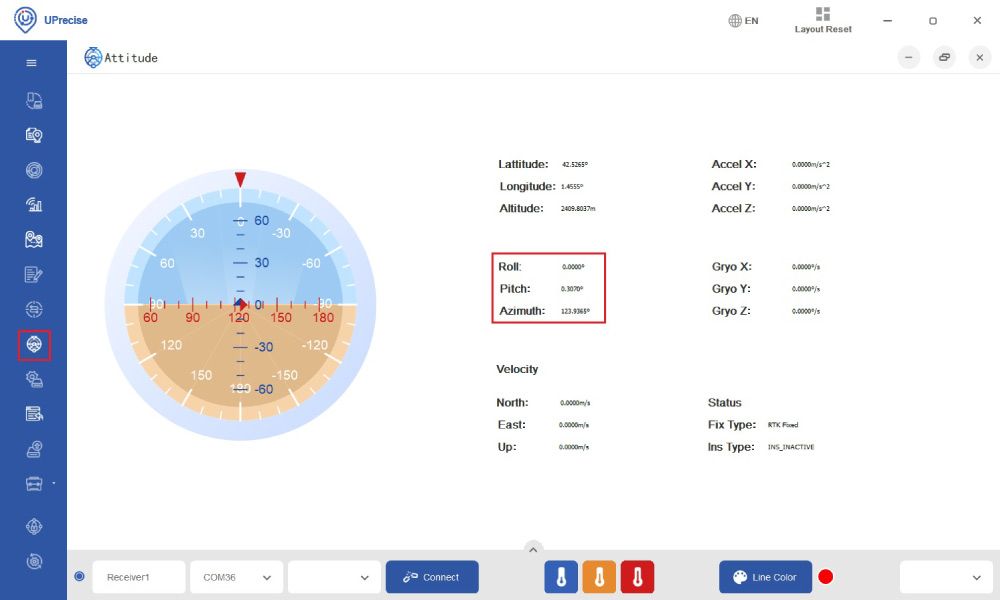
- You can check heading information at Attitude.
- At Data Stream you can see the UNIHEADING Message. Don’t forget to type saveconfig and press Enter to save your configuration.
- If you would like to learn more in-depth information, such as Message Structure, commends, and advanced configuration please refer to the Unicore Reference Commends Manual.
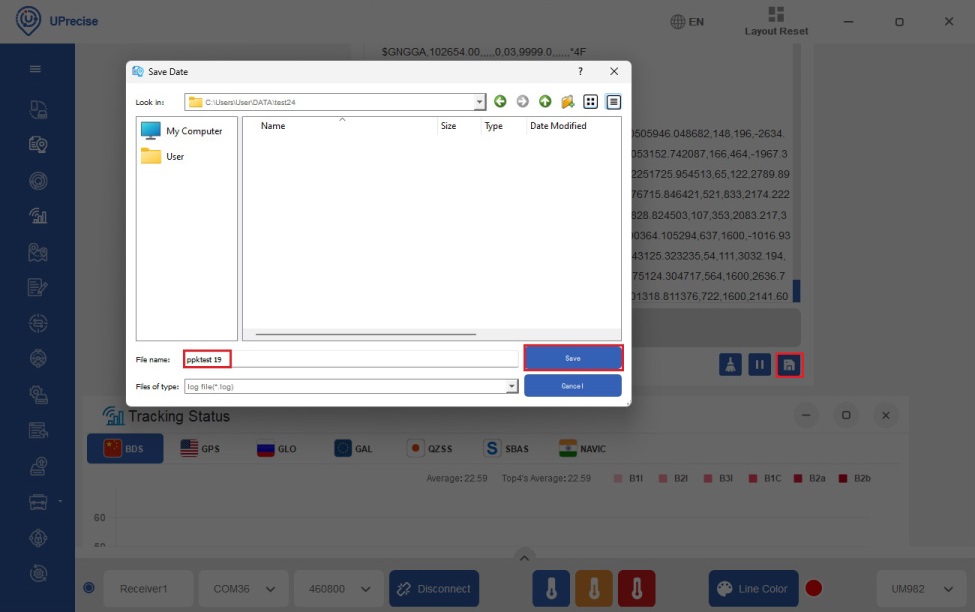
Log data and replay
- Click the Save File icon at the right bottom corner of Data Stream. Choose the folder and file name where you want to save the log file, and click Save. Your receiver will start to log data.
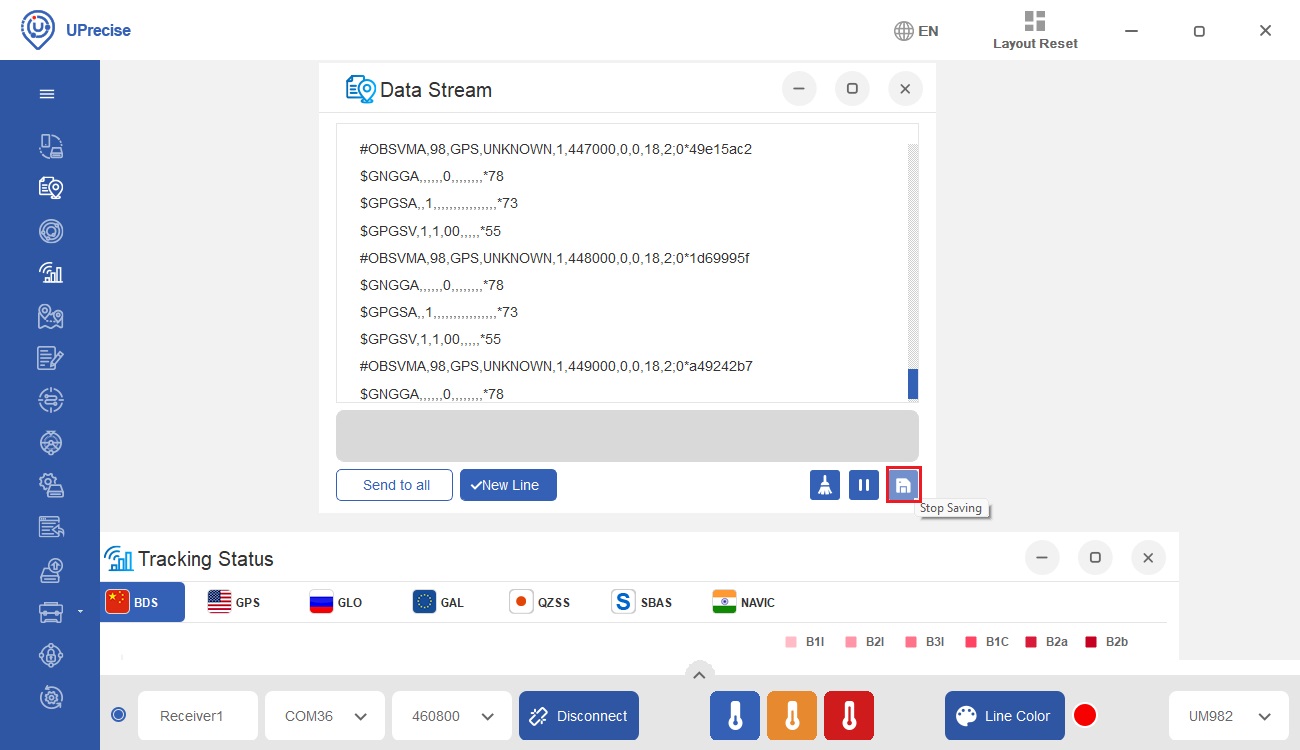
- When you finish, simply click the same icon to stop saving.
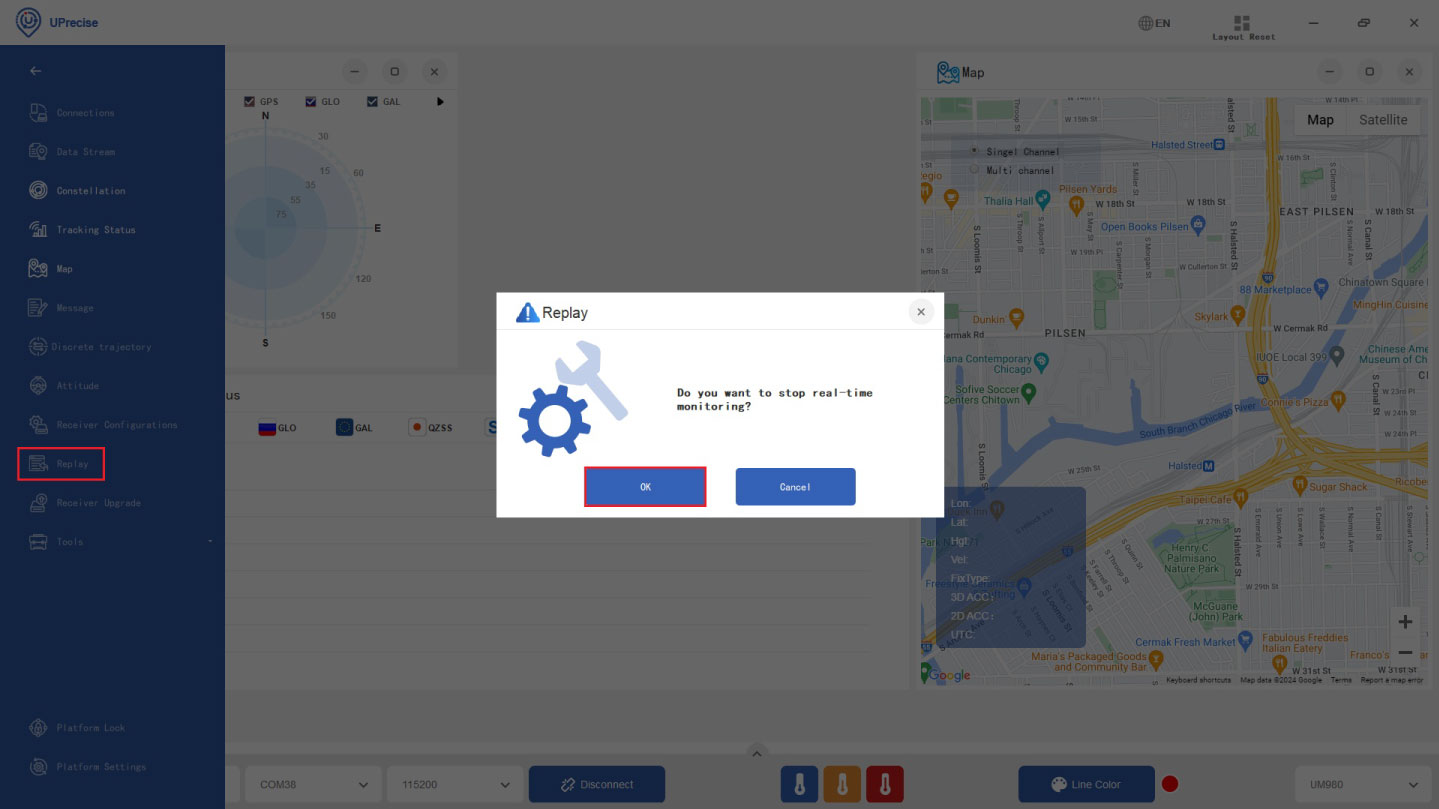
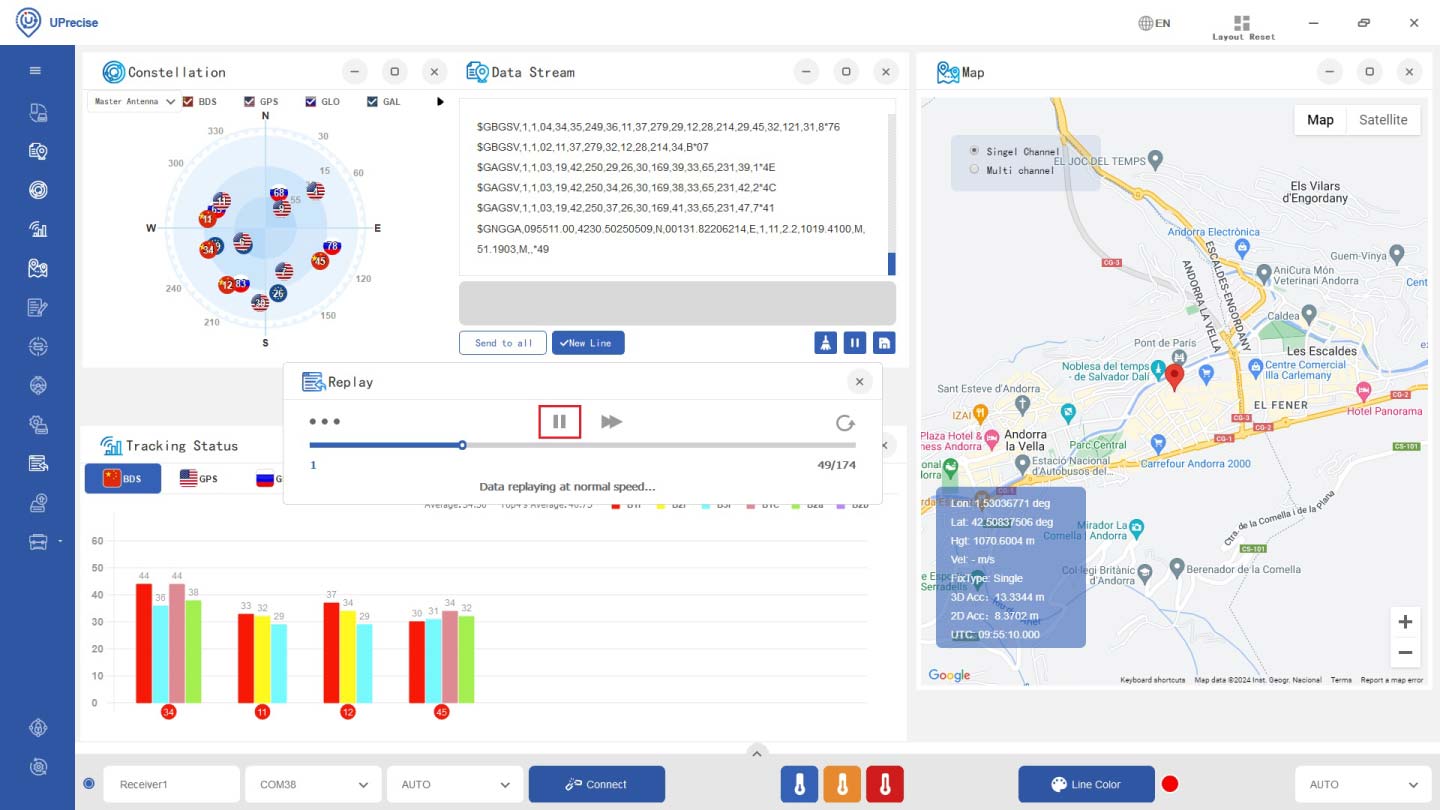
- If you want to check your logged data, at menu bar go to replay. Click Ok in the dialog box.
- Click the icon ··· to select the file path and file name. Click Open.
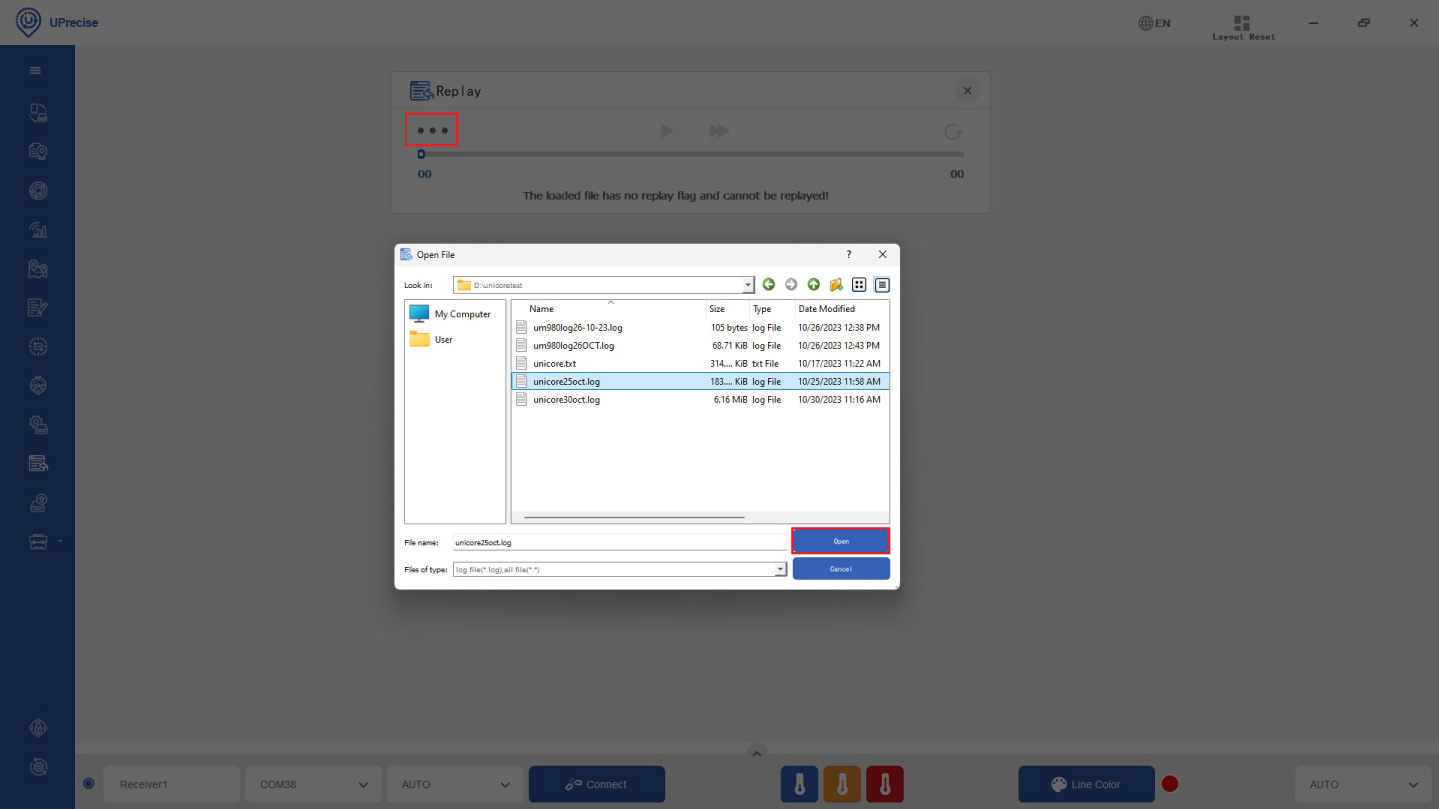
- Click the icon play. During the replay, UPrecise displays the satellites in view, positioning information, parsed messages, satellite distribution etc.
Firmware upgrade
- You can check the firmware version by type version at command window.
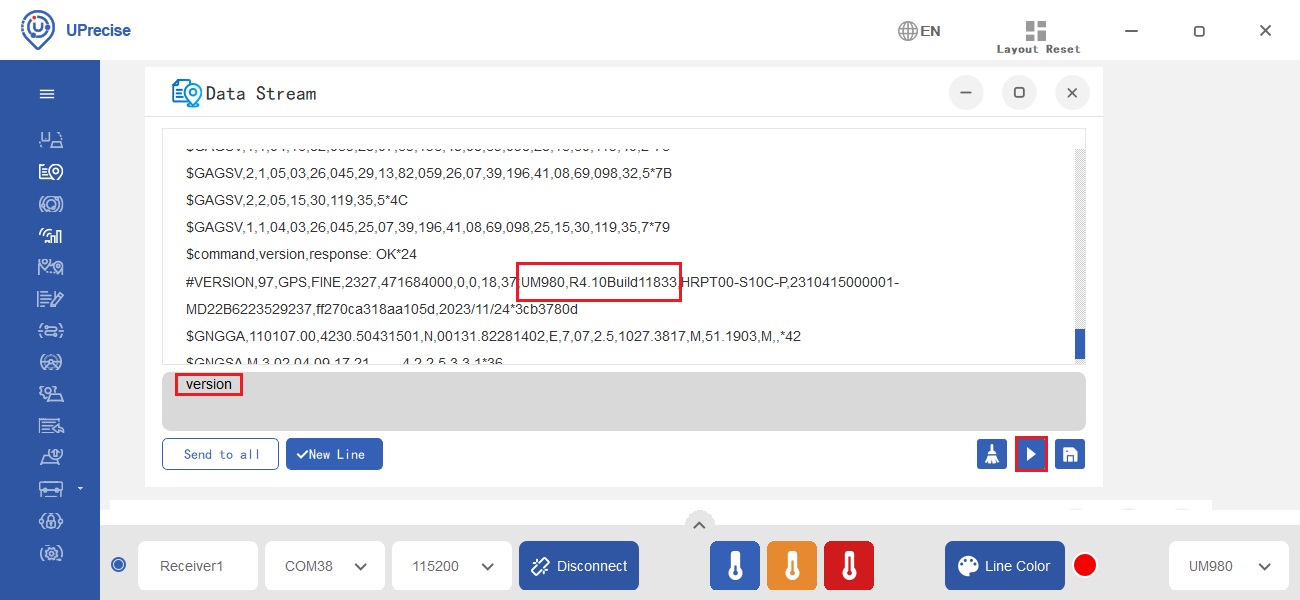
-
- For simpleRTK3B Budget(UM980) users, the recommended firmware version is 13504.
- For simpleRTK3B Fusion (UM981) users, we only provide support for the Precision Agriculture firmware. The recommended firmware version is 10598.

- For simpleRTK3B Compass (UM982) users, the recommended firmware version is 11826.
You can download the firmware here below or contact Unicore Communications for the latest firmware version.
Download the firmware for UM980 here. It is a ZIP folder, unzip password is 1234.
Download the firmware for UM981 for Precision Agriculture here. It is a ZIP folder, unzip password is 1234.
Download the firmware for UM982 here. It is a ZIP folder, unzip password is 1234.
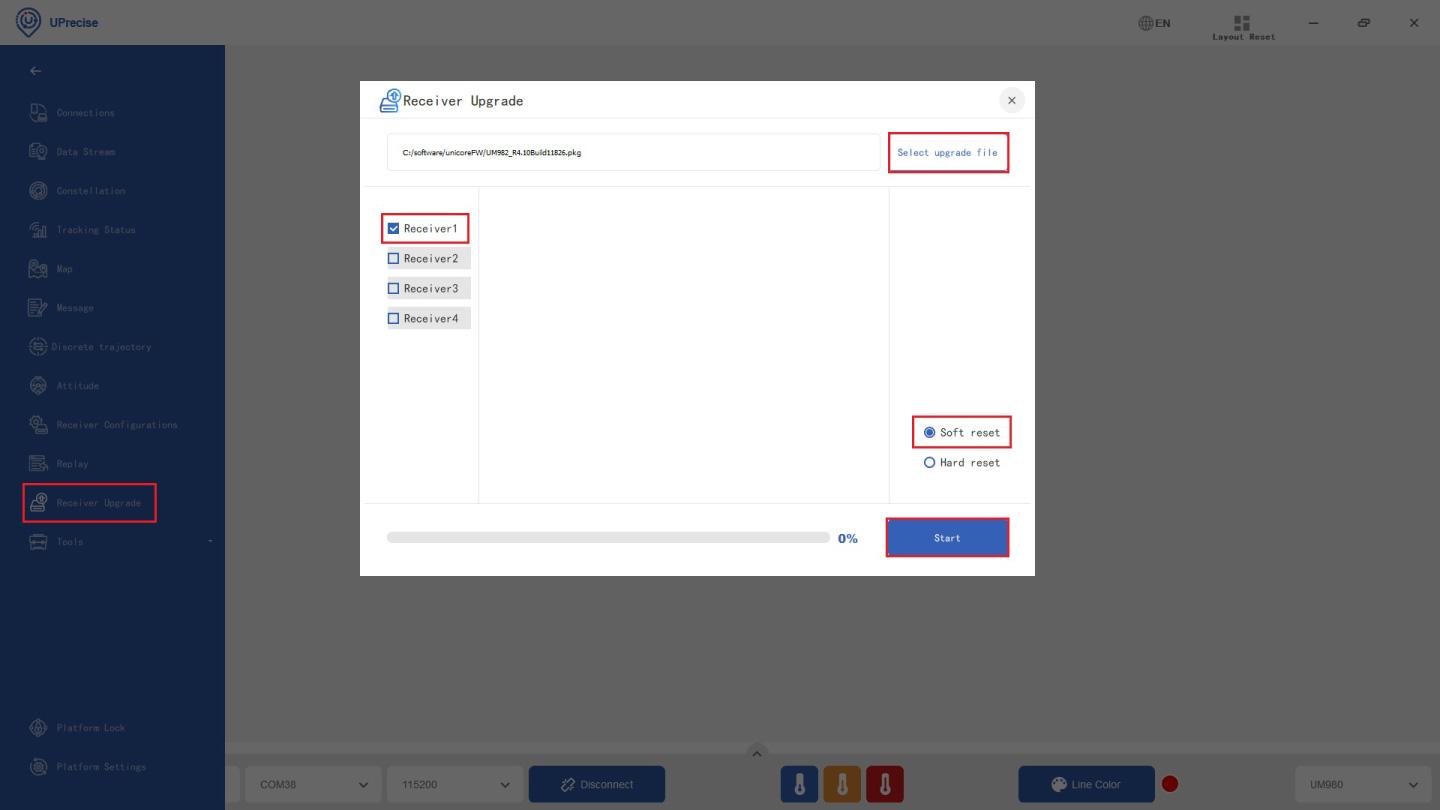
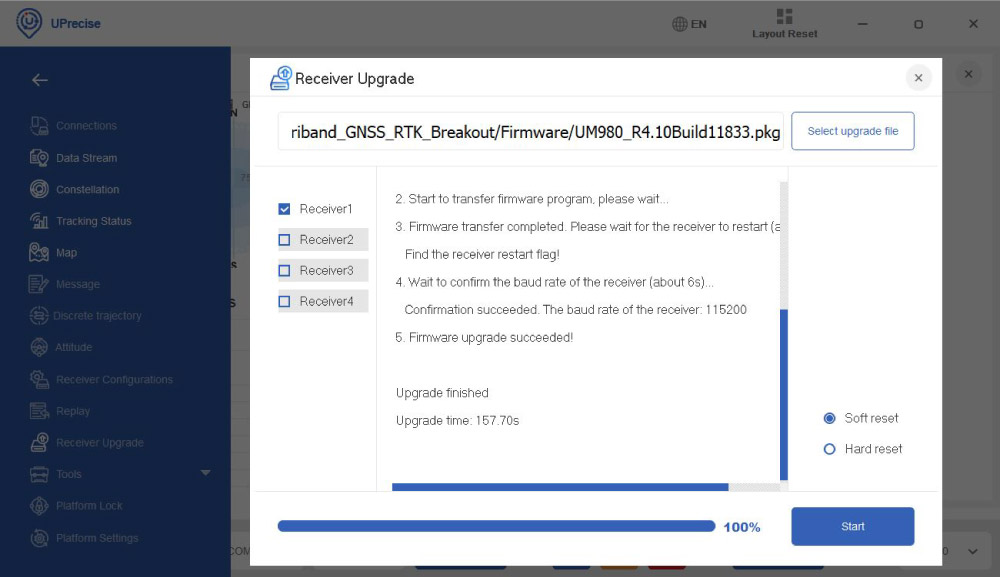
- Go to Receiver Upgrade. Select the upgrade file you download in step 35. Check the Receiver connected. Choose Soft reset. Click Start.
- After seeing Firmware upgrade succeeded and Upgrade finished, you can close the window.
Frequently used commands
Frequently used commands are listed below. You can use them in Uprecise or your preferred serial terminal software such as Realterm.
| Command Name | Description |
|---|---|
| freset | Clear the saved configurations, satellite ephemerides, position information, and reset the baud rate to 115200 bps. |
| version | Query version information |
| config | Query status of the serial port |
| mask BDS | Disable BDS. BDS/GPS/GLO/GAL can be disabled respectively. |
| unmask BDS | Disable BDS. BDS/GPS/GLO/GAL can be disabled respectively. |
| config com1 115200 | Configure COM1 port to operate at 115200 baud rate. The usable COM ports are: COM1, COM2, COM3. |
| unlog | Disable all outputs from the port in use |
| saveconfig | Save configurations |
| mode base time 60 | After 60 seconds of automatic positioning, set the average value of positioning results as the base station coordinates. |
| mode base lat Lon height | Set datum coordinates manually: lat, lon, height. The coordinates do not change when restarting the receiver. |
| mode base | Set the base station mode |
| mode rove | Set the default rover station mode |
| gpgga comx 1 | Set the output rate of GGA message to 1Hz. |
Unicore documentation
If you are an advanced user seeking detailed information, please refer to the Unicore documentation provided below:
-

-
-
- RTK3B Boards
simpleRTK3B Micro Unicore
From 276,00€ This product has multiple variants. The options may be chosen on the product page

